Managing NSE 3000 using cnMaestro
NSE 3000 is managed using the cloud-hosted cnMaestro (a management solution from Cambium Networks).
This section covers the following topics:
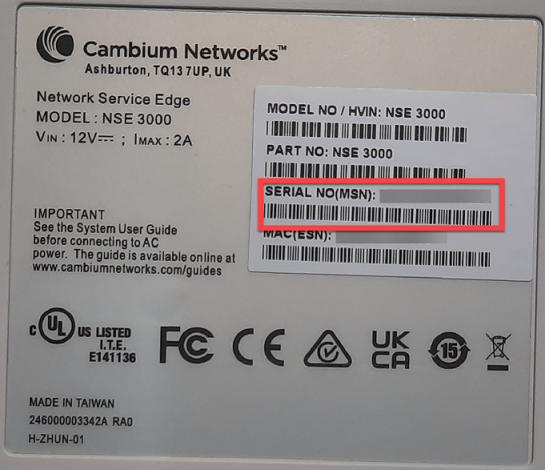
A device manufacturer serial number (MSN) is required to claim an NSE device. You can find the device MSN at the bottom of the device as shown in Figure 1.
Figure 1 MSN of the NSE device
To claim an NSE device that is associated with a site, complete the following steps:
| 1. | From the home page, navigate to Monitor and Manage. |
The System page appears, as shown in Figure 2.
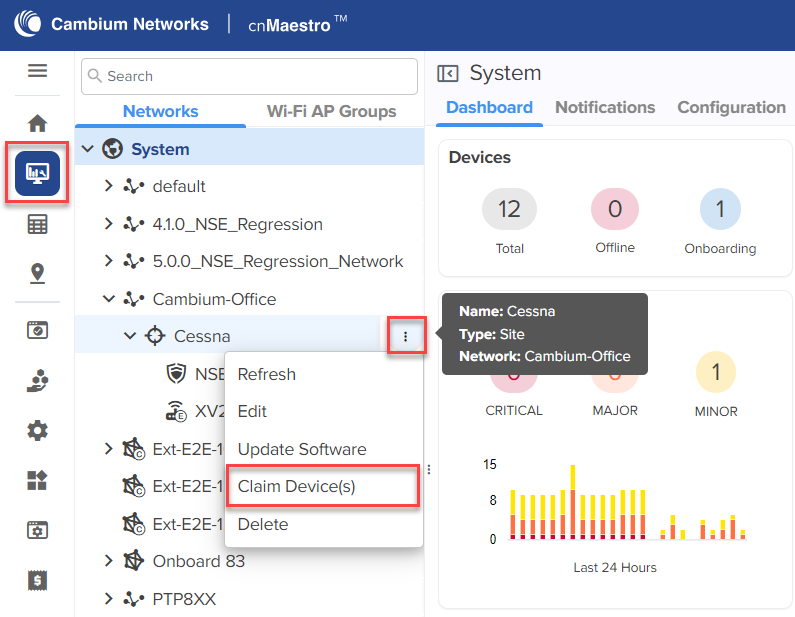
| 2. | On the left panel, in the Networks section, expand the site panel. |
| 3. | Click theactions |
The Claim Devices window appears, as shown in Figure 3.
Figure 3 The Claim Devices window
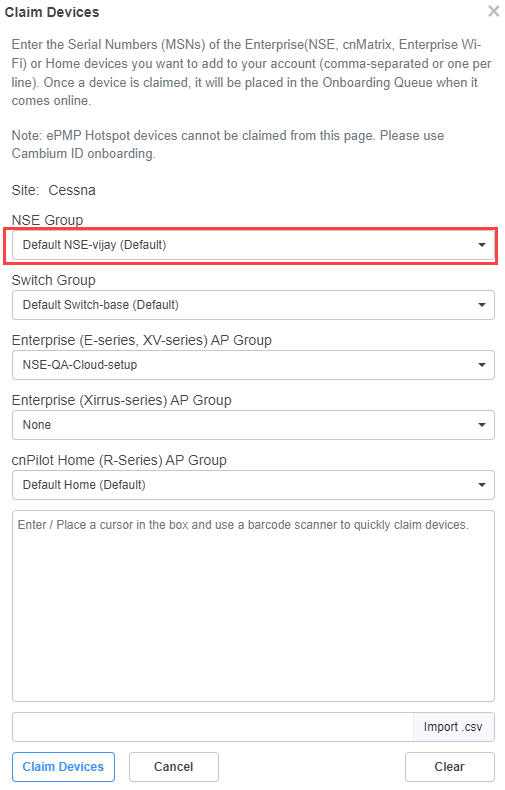
| 4. | From the NSE Group drop-down list, select the required group. |
|
|
The selected NSE group is automatically pushed to the device while onboarding. |
| 5. | In the Enter field, enter the MSN of the NSE device. |
| 6. | Click Claim Devices. |
The NSE device that is associated with a site is claimed successfully.
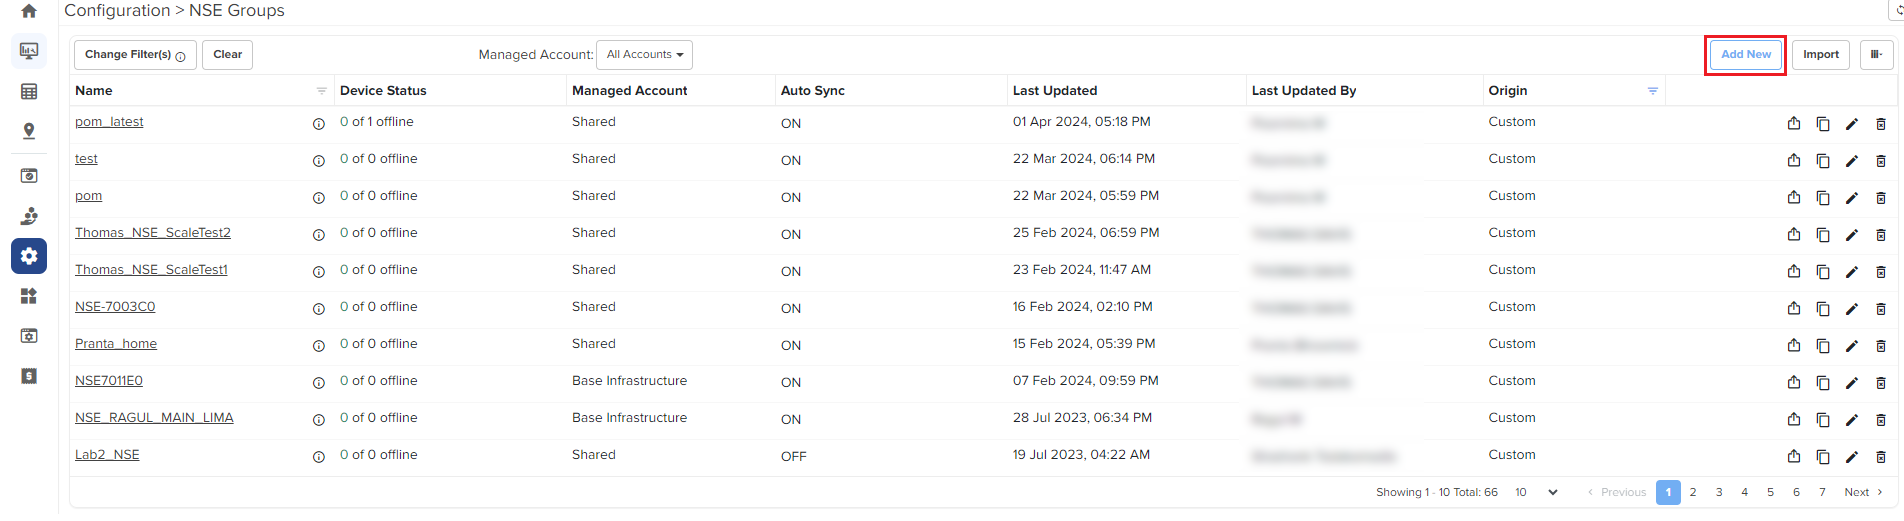
To configure NSE 3000 devices, create configuration profiles called NSE Groups.
To create and configure a new NSE 3000 group, navigate to Configuration > NSE Groups and click Add New.
Figure 4 Creating NSE groups
For a new NSE group, you must configure parameters using the following tabs:
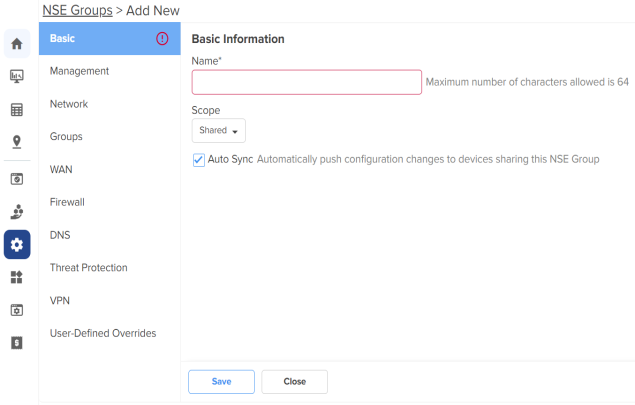
Using the Basic tab, you can configure basic group information, such as group name and group scope. You have the option to enable automatic synchronization of the configuration changes for devices associated with the NSE group.
To configure parameters on the Basic Information page, complete the following steps:
| 1. | Navigate to Configuration > NSE Groups and click Add. |
The Basic Information page appears, as shown in Figure 5.
Figure 5 The Basic Information page
| 2. | Configure the parameters, as described in Table 1. |
Table 1 Parameters on the Basic Information page
Parameter
Description
Name
Name for the NSE group.
This parameter allows a maximum of 64 characters.
This is a mandatory parameter.
Scope
Scope determines the availability of the NSE group across different tenant accounts.
By default, the following options are supported:
Shared - Configured NSE group will be available to other tenant accounts.
Basic Infrastructure - Configured NSE group will be available only to the Basic Infrastructure user. Other tenant accounts will not have access to the NSE group.
Auto Sync
Specifies whether the configuration changes made to the NSE group are automatically applied to all devices associated with the group.
By default, auto sync is enabled.
| 3. | Click Save. |
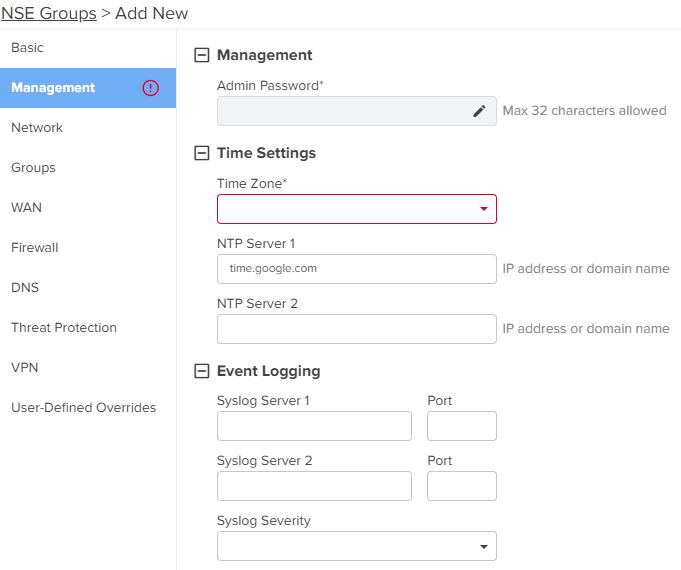
Using the Management tab, you can configure the profile-related parameters such as time settings and event logging.
To configure parameters on the Management page, complete the following steps:
| 1. | On the NSE Groups > Add New page, select the Management tab. |
The Management page appears, as shown in Figure 6.
| 2. | Configure the parameters, as described in Table 2. |
Table 2 Parameters on the Management page
Parameter
Description
On the Management page, there are Management, Time Settings, and Event Logging sections.
Management Admin Password
The password used to authenticate the NSE 3000 users who access through SSH or web.
This parameter allows a maximum of 32 characters.
This is a mandatory parameter.
Note: Click the edit
icon to reset the password.
Time Settings
Time Zone
The time zone based on the installation location of the device.
Select an appropriate time zone from the drop-down list to ensure that the device clock is synchronized with the wall clock time.
NTP Server 1
The IPv4 address or domain name of the primary Network Time Protocol (NTP) server.
NTP Server 2
The IPv4 address or domain name of the secondary or a backup NTP server.
Event Logging
Syslog Server 1
The IPv4 address or the domain name of the syslog server 1.
Port
The port number of the syslog server 1 to which the syslog messages are sent.
Supported value: 1 to 65535.
Syslog Server 2
The IPv4 address or the domain name of the syslog server 2.
Port
The port number of the syslog server 2 to which the syslog messages are sent.
Supported value: 1 to 65535.
Syslog Severity
The logs with the selected severity level that must be forwarded to the server.
The following options are supported:
Emergency (Level 0)
Alert (Level 1)
Critical (Level 2)
Error (Level 3)
Warning (Level 4)
Notice (Level 5)
Info (Level 6)
Debug (Level 7)
| 3. | Click Save. |
Using the Network tab, you can configure LAN ports, VLANs, and static routes.
To configure parameters on the Network page, complete the following steps:
| 1. | On the NSE Groups > Add New page, select the Network tab. |
The Network page appears, as shown in Figure 7.
| 2. | Configure the parameters, as described in Table 3. |
Table 3 Parameters on the Network page
Parameter
Description
On the Network page, there are LAN Ports, VLANs, and Static Routes sections.
LAN Ports
Click the edit
Name
Name of the LAN port.
This parameter cannot be modified.
Mode
The VLAN mode of the port.
The following options are supported:
Access Single VLAN: An access port which places all traffic on its configured VLAN and only passes untagged traffic.
Description
A brief description of the LAN port.
VLAN
This parameter is applicable only when the Mode parameter is set to Access Single VLAN.
By default, VLAN value is 1.
VLAN value can be in the range: 1 to 4094
This is a mandatory parameter.
Native VLAN
Indicates that the traffic on the native VLAN is untagged. This parameter is applicable only when the Mode parameter is set to Trunk Multiple VLANs.
The Native VLAN value can be in the range: 1 to 4094
This is a mandatory parameter.
Tag the native VLAN
This parameter is applicable only when the Mode parameter is set to Trunk Multiple VLANs. When theTag the native VLAN parameter is enabled, the native VLAN traffic is tagged with 802.1Q.
Allowed VLANs
This parameter is applicable only when the Mode parameter is set to Trunk Multiple VLANs.
This parameter supports a range or comma-separated list of VLANs. Example: 1-3 or 4, 10, 22
Auto VLAN This parameter is applicable only when the Mode parameter is set to Trunk Multiple VLANs.
This parameter facilitates automatic assignment of VLANs in cnMatrix switches and access points (APs). When this parameter is enabled, the cnMatrix switches and APs use the Link Layer Discovery Protocol (LLDP) packets to obtain a list of VLANs for automatic assignment.
Note: Auto VLAN works only with cnMatrix switches and access points (APs). It does not work with any third-party switches and APs. Auto VLAN allows cnMatrix switch to dynamically learn VLANs from an AP. The AP advertises the configured VLANs to the cnMatrix switch. The cnMatrix switch then advertises those VLANs to the uplink NSE device. This process ensures that VLANs are properly bridged.
This parameter is enabled by default.
Auto VLAN Message Authentication This parameter is applicable only when the Mode parameter is set to Trunk Multiple VLANs.
This parameter enables authentication for the LLDP messages where the VLANs are advertised.
This parameter is enabled by default.
Link Speed Advertisement
Indicates the port speed that must be configured for advertisement.
Default: Auto
The following options are supported:
Auto
10 Mbps
100 Mbps
1000 Mbps
Port Duplex
Specifies the mode of port communication. The following options are supported:
Full Duplex
Half Duplex
Port Speed
Specifies the port speed.
Default: Auto
The following options are supported:
Auto
10 Mbps
100 Mbps
1000 Mbps
Shutdown
Enables or disables the port.
By default, this parameter is disabled.
VLANs
Note: You can configure up to 128 VLANs.
To add a new VLAN, click Add New. The Add New VLAN window appears, as shown in Figure 9.
To edit an existing VLAN configuration, click the edit
VLAN ID
Indicates the VLAN ID.
The VLAN ID value can be in the range: 1 to 4094
This is a mandatory parameter.
Description
Displays the user-configured description for the VLAN.
IP Address
IPv4 address that is assigned to the VLAN.
This is a mandatory parameter.
Subnet Mask
Subnet mask that is assigned to the VLAN.
This is a mandatory parameter.
Management Access
Indicates whether the management access is enabled or disabled.
By default, this parameter is enabled.
Enable Rate Limit
Indicates whether the rate limit is enabled or disabled.
By default, this parameter is disabled.
When you select the Enable Rate Limit check box, the Rate Limit parameter appears.
Rate Limit
Specifies the rate of requests sent or received. This parameter appears only when you enable the Enable Rate Limit parameter.
This parameter supports only integer values.
This is a mandatory parameter.
DHCP mode Specifies the DHCP mode.
The following options are supported:
None
DHCP Server - When you select this option, the DHCP server-related parameters appear.
DHCP Relay - When you select this option, the Relay Server IP address parameter appears.
DHCP Server
In addition to the below parameters, you must also configure the parameters in the DHCP Options and MAC Binding List sections, as shown in Figure 10.
Start IP address
Starting IPv4 address in the range.
This is a mandatory parameter.
End IP address
Ending IPv4 address in the range.
This is a mandatory parameter.
Primary DNS
The primary DNS server for clients on the network.
If the DNS server option is enabled on the NSE, the IPv4 address configured for the VLAN can be provided as the DNS server for the network.
Secondary DNS
The secondary DNS server for clients on the network.
Domain
The DNS search domain for the network.
Lease Time
The DHCP lease expiry time for the DHCP pool (in days, hours, and minutes).
This is a mandatory parameter.
DHCP Options
NSE allows configuration of standard and custom DHCP options.
To add a new DHCP option, click Add New. The Add New DHCP Option window appears, as shown in Figure 11.
To edit an existing DHCP option, click the edit
Option
The following DHCP options are supported:
Log server(7)
Domain name(15)
NTP server(42)
Vendor specific information(43)
Vendor class identifier(60)
TFTP server name(66)
Boot file name(67)
Proxy auto config(252)
Custom
This is a mandatory parameter.
Code
A value for the code.
This parameter allows a maximum value of 254.
This is a mandatory parameter.
Type
The following options are supported:
Text
IP Address
Integer
This is a mandatory parameter.
Value
A value in ASCII.
This is a mandatory parameter.
MAC Binding List
For every DHCP pool configured, the user can bind the client MAC address with an IPv4 address from the network. This enables the client to obtain the same IPv4 address whenever they connect to the NSE device.
Following parameters are required to create the binding list:
MAC address of the client
IPv4 address from the configured pool
When you set MAC and IP address fields and click Add, the binding of MAC and IP address is added.
Note: Upto 200 MAC to IP address bindings are supported per DHCP pool.
Note: When you bind, the binding IP address should be outside the DHCP pool range.
To add a new MAC binding, click Add New. The Add New MAC Binding window appears, as shown in Figure 12.
To edit an existing MAC binding, click the edit
MAC
The MAC address of the client.
This is a mandatory parameter.
IP Address
The IPv4 address that must be assigned to the client.
This is a mandatory parameter.
Description
Displays the user-configured description.
Import
Imports the MAC bindings.
Note: The CSV file that you import must be in the three-column format, for example, MAC, IP address, and Description.
To import MAC bindings, click Import. The Import MAC Bindings window appears, as shown in Figure 13.
Replace existing list
Indicates whether the imported bindings will overwrite the existing list or append to the list.
If enabled, the imported bindings will overwrite the existing list
If disabled, the imported bindings will append to the existing list.
By default, this parameter is enabled.
Export
Exports the configured bindings list.
The following options are supported:
Export all as CSV
Export page as CSV
To export MAC bindings, click Export. The export options appear, as shown in Figure 14.
DHCP Relay Indicates whether the DHCP relay unicasts the DHCP request to an external DHCP server.
This is a mandatory parameter.
Relay Server IP address IPv4 address of the external DHCP server.
This is a mandatory parameter.
Static Routes
To add a new route, click Add New. The Add New Route window appears, as shown in Figure 15.
To edit an existing route, click the edit
Destination Network
The IPv4 address of the destination network.
This is a mandatory parameter.
Prefix Length
The prefix length for the network address.
This parameter supports integer values and a maximum value of 32.
This is a mandatory parameter.
Next Hop
The next hop IPv4 address for the route.
This is a mandatory parameter.
Exit Interface
The exit interface through which the next hop is reachable.
This is a mandatory parameter.
Metric
The metric for the route.
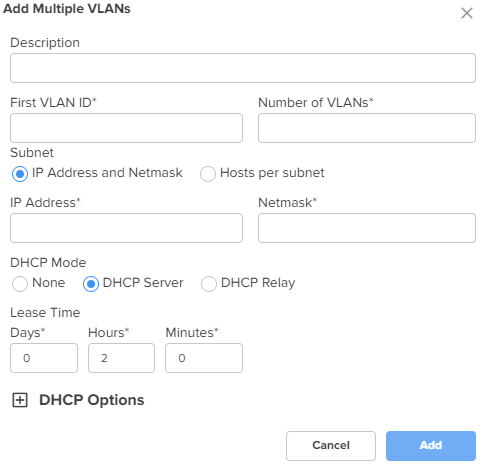
To add multiple VLANs, click the Add Multiple button. The Add Multiple VLANs window appears, as shown in Figure 16.
To edit an existing VLAN configuration, click the edit
Description
Displays the user-configured description for the VLAN.
First VLAN ID Indicates the first VLAN ID.
The supported VLAN ID value range is between 1 and 4094.
This is a mandatory parameter.
Number of VLANs Indicates the number of VLANs that you want to add.
Note: You can configure up to 128 VLANs.
This is a mandatory parameter.
Subnet
The following options are supported:
IP Address and Netmask - When you select this option, the IP address and Netmask options appear.
Hosts per subnet - When you select this option, the First IP Address and Hosts per subnet options appear.
IP address The IPv4 address of the first VLAN.
This is a mandatory parameter.
Netmask The netmask of the subnet.
This is a mandatory parameter.
First IP Address The first IPv4 address of the subnet.
This is a mandatory parameter.
Hosts per subnet The number of hosts that you want for the subnet.
This is a mandatory parameter.
DHCP mode Specifies the DHCP mode.
The following options are supported:
None
DHCP Server - When you select this option, the DHCP server-related parameters appear.
DHCP Relay - When you select this option, the Relay Server IP address parameter appears.
Lease Time The DHCP lease expiry time for the DHCP pool (in days, hours, and minutes).
This is a mandatory parameter.
DHCP Options
NSE allows configuration of standard and custom DHCP options.
To add a new DHCP option, click Add New. The Add New DHCP Option window appears, as shown in Figure 11.
To edit an existing DHCP option, click the edit
Option
The following DHCP options are supported:
Log server(7)
Domain name(15)
NTP server(42)
Vendor specific information(43)
Vendor class identifier(60)
TFTP server name(66)
Boot file name(67)
Proxy auto config(252)
Custom
This is a mandatory parameter.
Code
A value for the code.
This parameter allows a maximum value of 254.
This is a mandatory parameter.
Type
The following options are supported:
Text
IP Address
Integer
This is a mandatory parameter.
Value
A value in ASCII.
This is a mandatory parameter.
DHCP Relay Indicates whether the DHCP relay unicasts the DHCP request to an external DHCP server.
This is a mandatory parameter.
Relay Server IP address IPv4 address of the external DHCP server.
This is a mandatory parameter.
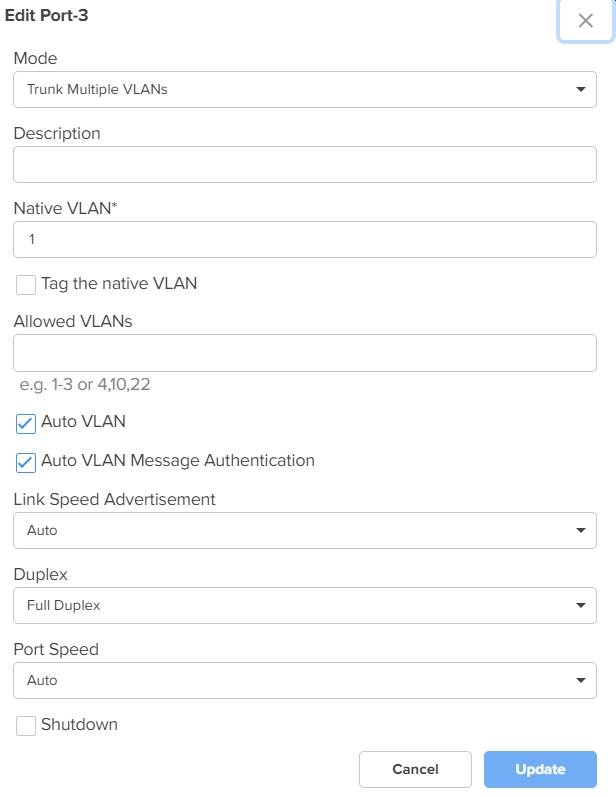
Figure 9 The Add New VLAN window
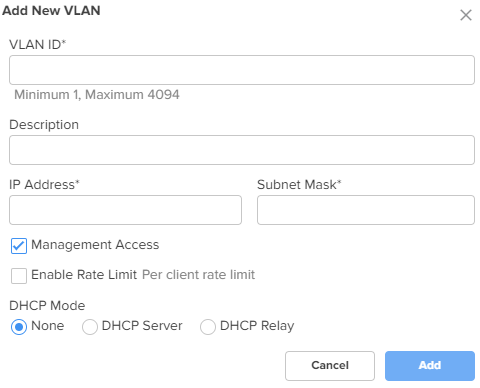
Figure 10 DHCP Options and MAC Binding List
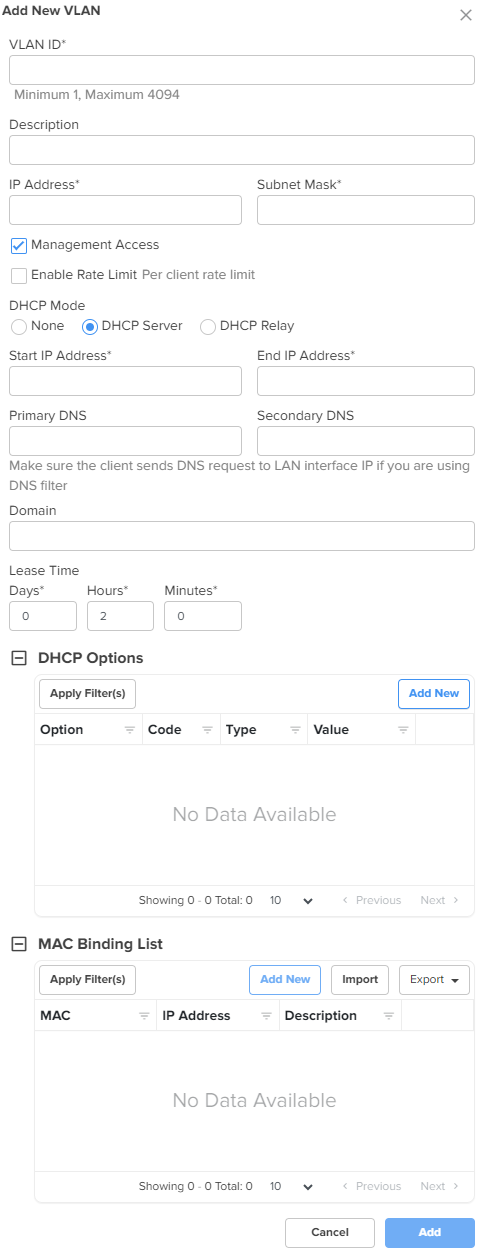
Figure 11 The Add New DHCP Option window
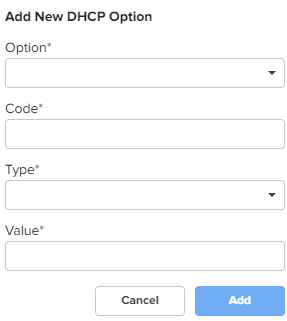
Figure 12 The Add New MAC Binding window
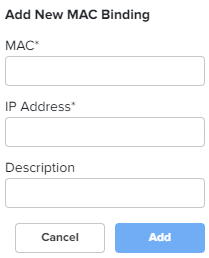
Figure 13 The Import option in MAC Binding List
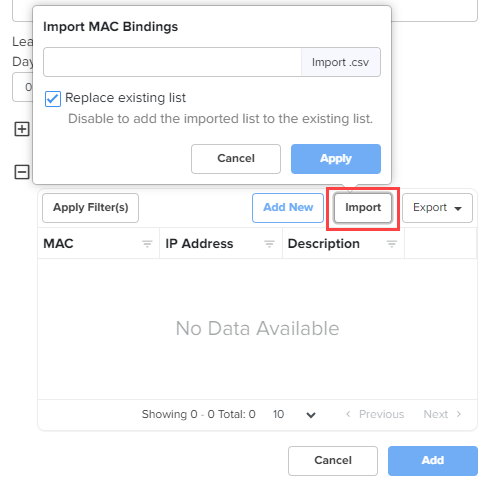
Figure 14 The Export option in MAC Binding List
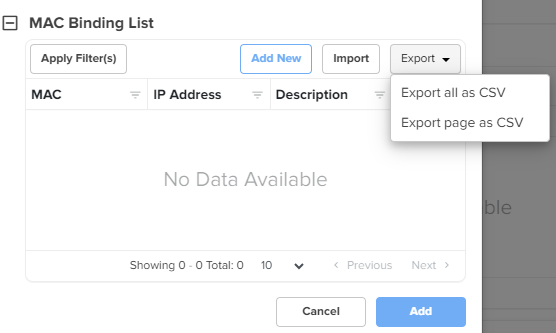
Figure 15 The Add New Route window
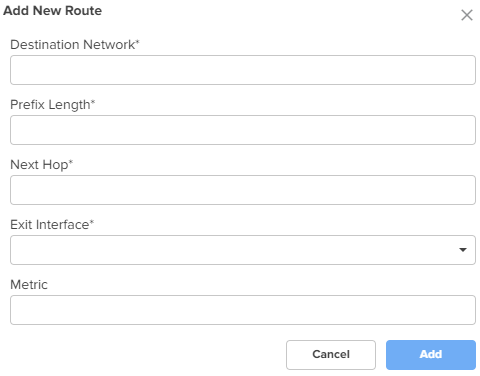
Figure 16 The Add Multiple VLANs window
| 3. | Click Save. |
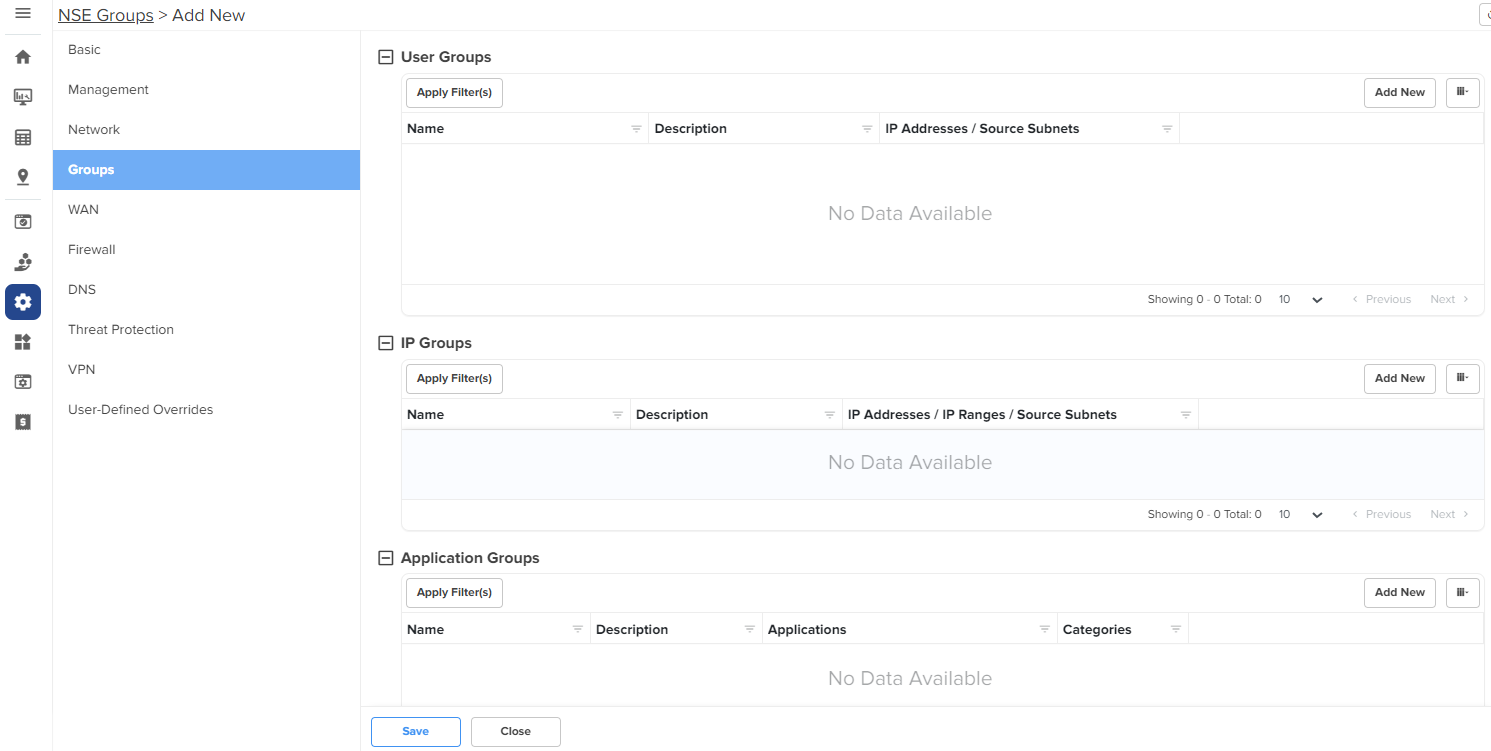
Using the Groups tab, you can configure user groups, IP groups, and application groups.
To view the Groups page, complete the following steps:
| 1. | On the NSE Groups > Add New page, select the Groups tab. |
The Groups page appears, as shown in Figure 17.
| 2. | Configure the parameters, as described in Table 4. |
Table 4 Parameters on the Groups page
| Parameter | Description |
|---|---|
| On the Groups page, there are User Groups, IP Groups, and Application Groups sections. | |
|
User Groups User groups are used to group locally configured networks and these groups can be used to associate with policies, especially application rules or DNS rules. To add a new user group, click Add New. The Add User Group window appears, as shown in Figure 18. To edit a user group, click the edit |
|
|
Name |
Name for the user group. This is a mandatory parameter. |
|
Description |
Description for the user group. |
|
IP Addresses/Source Subnets |
IPv4 addresses or source subnets for the user group. This is a mandatory parameter. |
|
IP Groups IP groups are used to group networks originating from the WAN, and can be used to attach port forwarding rules. To add a new IP group, click Add New. The Add IP Group window appears, as shown in Figure 19. To edit an IP group, click the edit |
|
|
Name |
Name for the IP group. |
|
Description |
Description for the IP group. |
|
IP Addresses/IP Ranges/Source Subnets |
IPv4 addresses, IP ranges, or source subnets for the IP group. This is a mandatory parameter. |
|
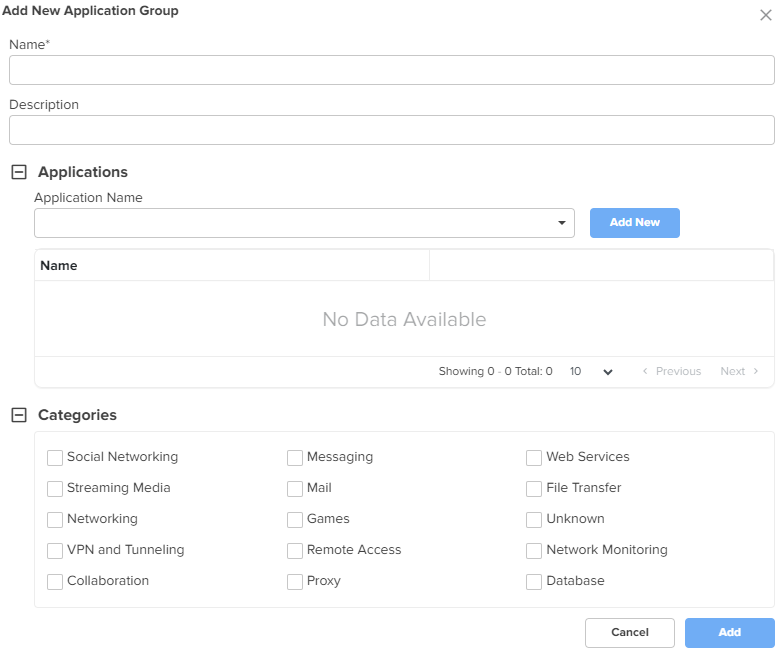
Application Groups Application groups are used to group applications by using application names or categories, which can then be attached to a policy for permitting or denying access. To add a new application group, click Add New. The Add New Application Group window appears, as shown in Figure 20. To edit an application group, click the edit |
|
|
Name |
Name for the application group. |
|
Description |
Description for the application group. |
|
Applications To add applications to the application group, select the required application(s) from the drop-down list and click Add New. The selected applications are added in the Name list. |
|
| Application Name | Applications for the new application group. |
|
Categories To include categories for the new application group, select the required categories. |
|
| Categories | Categories for the new application group. |
Figure 18 The Add User Group window
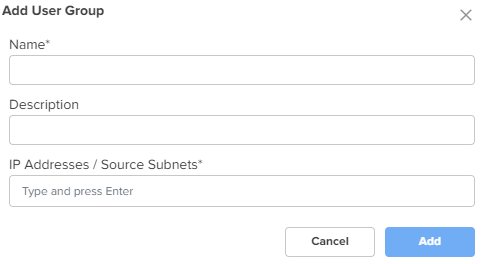
Figure 19 The Add IP Group window
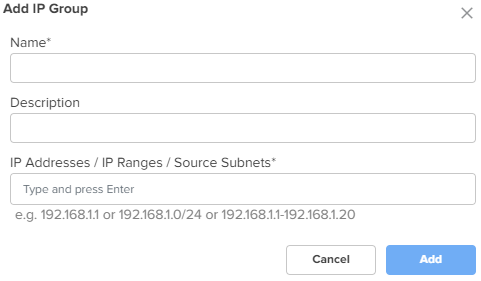
Figure 20 The Add New Application Group window
| 3. | Click Save. |
Using the WAN tab, you can configure the settings related to the WAN interface.
To configure parameters on the WAN page, complete the following steps:
| 1. | On the NSE Groups > Add New page, select the WAN tab. |
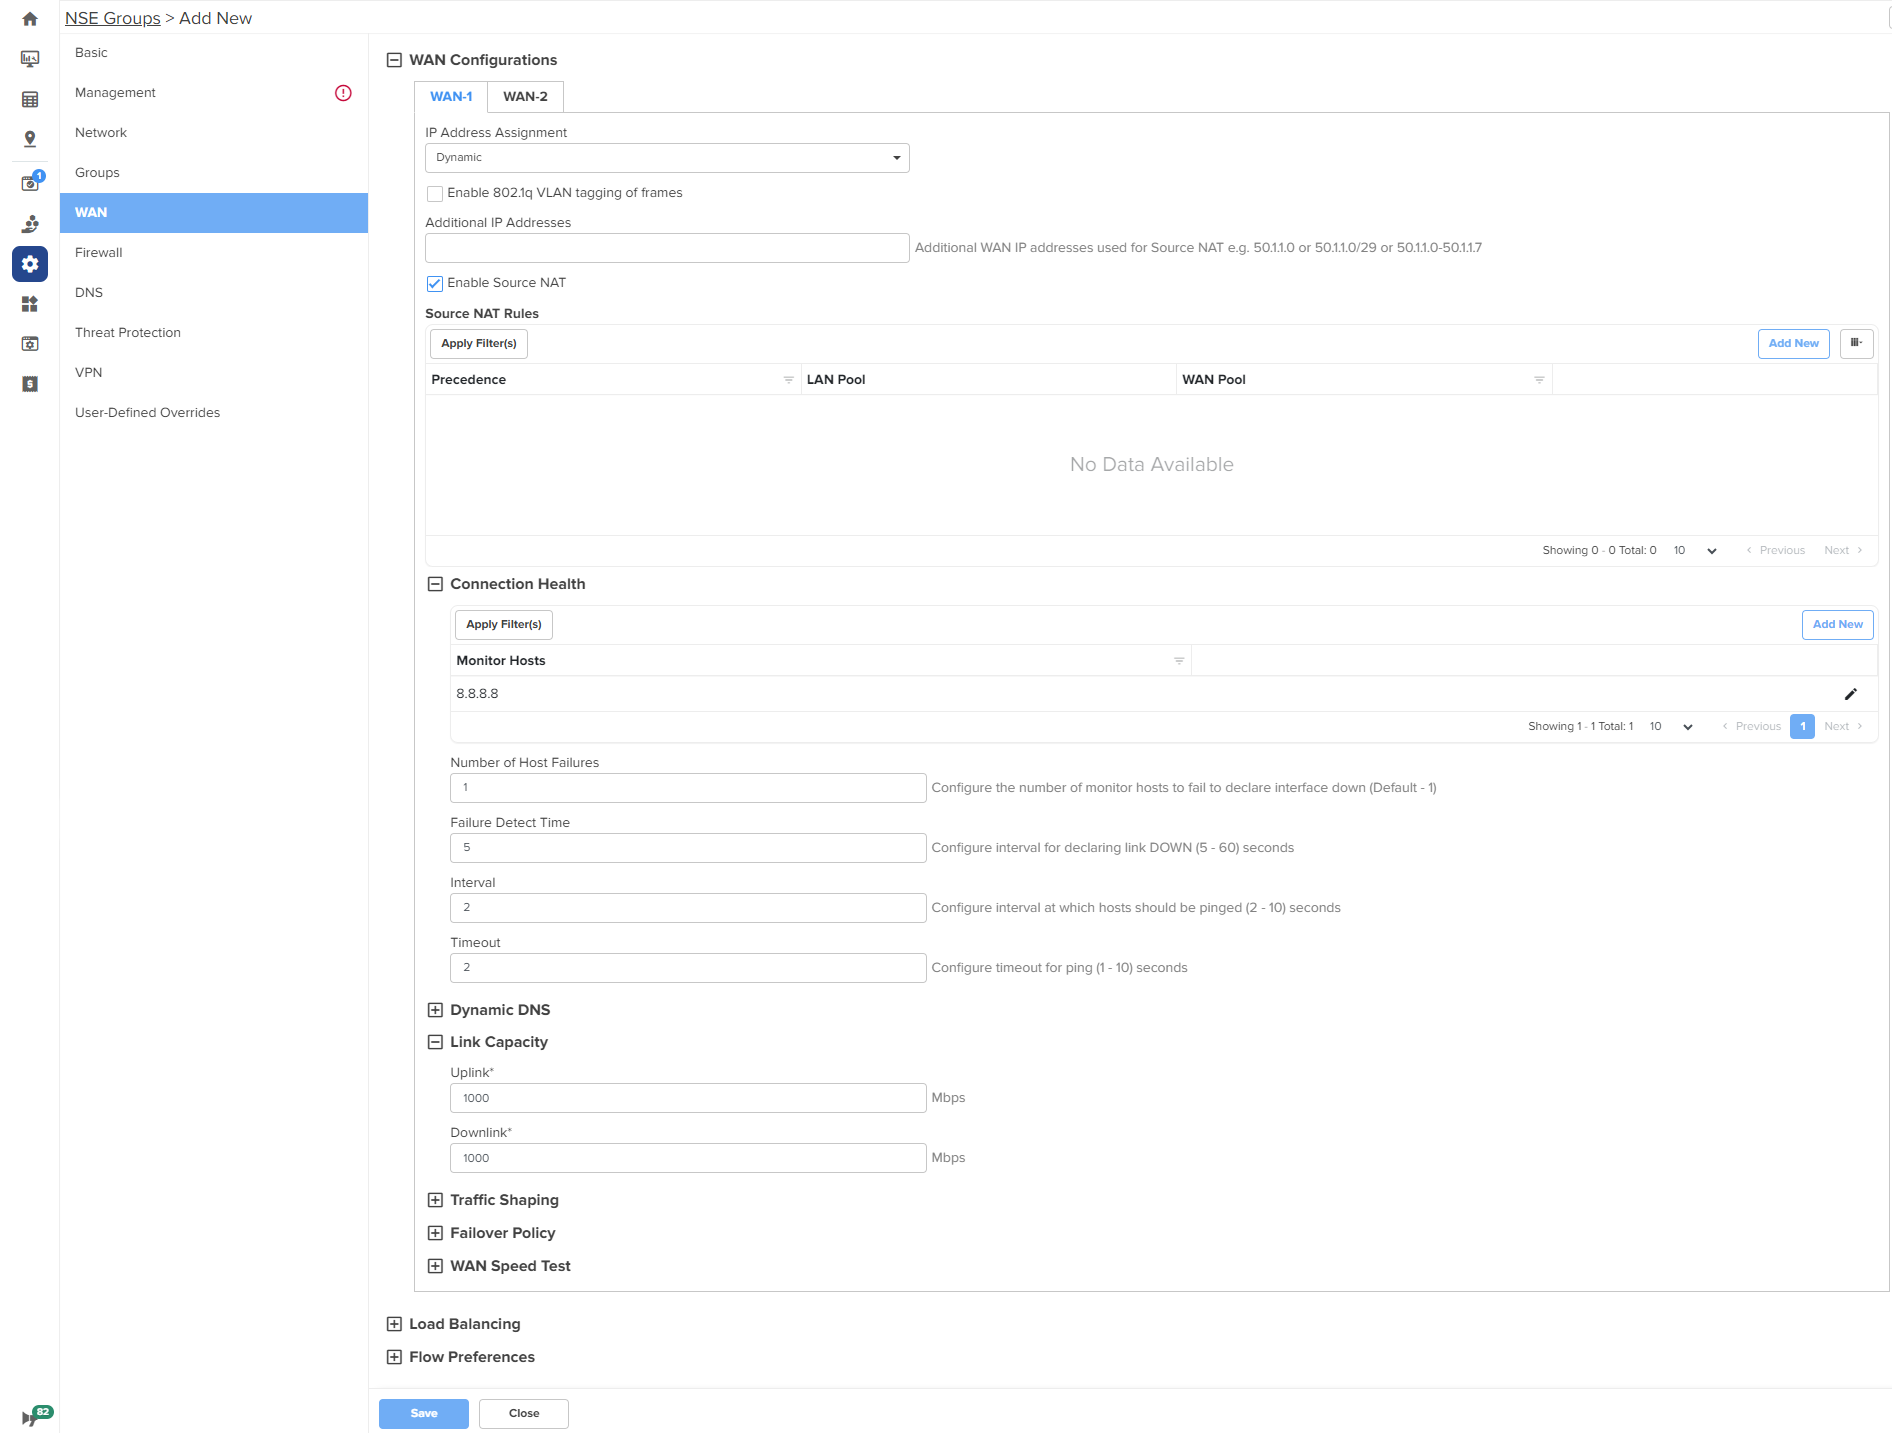
The WAN page appears, as shown in .
Figure 21 NSE WAN page
| 2. | Configure the parameters, as described in Table 5. |
Table 5 Parameters on the WAN page
|
Parameter |
Description |
|---|---|
|
On the WAN page, there are WAN Configurations, Load Balancing, and Flow Preferences sections. |
|
|
WAN Configurations In this section, you can configure the parameters in Connection Health, Dynamic DNS, Link Capacity, Traffic Shaping, Failover Policy, and WAN Speed Test subsections. The same parameters appear in both WAN-1 and WAN-2 tabs. |
|
|
IP Address Assignment |
Determines the mode of IP address assignment for the WAN interface. The following options are supported:
|
|
Enable 802.1q VLAN tagging of frames |
When this parameter is enabled, 802.1Q tag is inserted with configured VLAN ID for all the packets going out of the WAN interface. By default, this parameter is disabled. |
|
VLAN ID |
This parameter is applicable only when Enable 802.1q VLAN tagging of frames check box is selected. VLAN ID range: 1 and 4094. This is a mandatory parameter. When the 802.1Q header is configured, all transmitted frames are expected to include the 802.1Q header with the same VLAN ID. |
|
Following parameters appear when you select Static from the IP Address Assignment drop-down list. |
|
|
IP Address |
The IPv4 address of the WAN interface. This is a mandatory parameter. |
|
Subnet Mask |
The subnet mask for the IPv4 address of the WAN interface. This is a mandatory parameter. |
|
Default Gateway |
The IPv4 address of the default gateway for the WAN interface. |
|
Primary DNS |
The IPv4 address of primary upstream DNS server on this interface. This is a mandatory parameter. |
|
Secondary DNS |
The IPv4 address of secondary upstream DNS server on this interface. |
|
Following parameters appear when you select PPPoE from the IP Address Assignment drop-down list. |
|
|
Account Controller Name |
Name of the account controller. This parameter allows a maximum of 32 characters. This parameter is optional. |
|
Service Name |
Indicates the service name of the Account Controller. This parameter allows a maximum of 32 characters. The service name configuration is optional. |
|
User |
User name for PPPoE authentication. This is a mandatory parameter. |
|
Password |
Password for PPPoE authentication. This parameter is optional. |
|
MTU |
MTU for PPPoE interface. MTU ranges from 500 to 1492 bytes. Default: 1492 bytes. |
|
TCP MSS Clamping |
Indicates whether TCP MSS Clamping is enabled or disabled. By default, this parameter is enabled. |
| Additional IP Addresses |
WAN IP addresses that are available for source NAT. Note:The WAN interface supports up to 16 IP addresses. |
|
Enable Source NAT |
Indicates whether the source NAT is enabled or disabled. When enabled, NSE device will replace the source IP address of the traffic routed from LAN to WAN with the WAN interface IP address. By default, this parameter is enabled. |
|
Source NAT Rules Allows user to configure source NAT rules. User can choose the WAN IP addresses from the Additional IP Address for source NAT. User can configure WAN IP address(es) of their choice for source NAT. By default, all the LAN users' traffic will be source NATed to the configured WAN IP address(es). When LAN pool is configured, the traffic from the specified LAN networks will be source NATed to the configured WAN IP address(es). Note: Source NAT Rules supports up to 16 rules per WAN. To add a new source NAT, click Add New. The Add New Source NAT Rule window appears, as shown in Figure 22. |
|
| Precedence |
The precedence value for the source NAT rule. The precedence value can be between 1 and 150. This is a mandatory parameter. |
| LAN Pool |
The following options are supported:
|
| WAN Pool |
The following options are supported:
|
| IP Address |
IPv4 address for the WAN pool. Applicable only when Single IP Address option is selected. |
| Start IP |
Starting IP address in the range. This parameter is applicable only when Multiple IP Addresses option is selected. This is a mandatory parameter. |
| End IP |
Ending IP address in the range. This parameter is applicable only when Multiple IP Addresses option is selected. This is a mandatory parameter. |
| IP Group |
Select the IP group for the source NAT. IP groups are the ones that you configure in the Groups > IP Groups section. This parameter is applicable only when IP Group option is selected. This is a mandatory parameter. |
| IP Address / Source Subnet |
This parameter is applicable only when IP Address / Source Subnet option is selected. This is a mandatory parameter. |
|
Connection Health This section is configured to monitor the WAN connection health. Click the edit To add a new monitor host, click Add New. The Add New Monitor Host window appears, as shown in Figure 24. |
|
|
Monitor Host |
The hosts used to monitor and collect network traffic data. Default: 8.8.8.8 This is a mandatory parameter. |
|
Number of Host Failures |
The number of monitor hosts that fail to declare the link down. Default value: 1 The maximum number of monitor hosts that can be configured to fail is 5. |
|
Failure Detect Time |
The time period (in seconds) during which the device waits for the response from the monitored host before declaring the link down. Default: 5. Range: 5 to 60 |
|
Interval |
The time interval (in seconds) used by the device to check and reach the monitor hosts. Default: 2. Range: 2 to 10 |
|
Timeout |
The time period (in seconds) the device waits for a response from the monitor host after which the connection is timed out. Default: 2. Range: 1 to 10 |
|
Dynamic DNS |
|
|
Enable Dynamic DNS |
Indicates whether the dynamic DNS for the interface is enabled or disabled. By default, this parameter is disabled. |
| Following parameters appear when Enable Dynamic DNS check box is selected. | |
|
DNS Provider |
The following options are supported:
By default, Noip option is selected. |
|
DNS Hostname |
Indicates the DNS host name. |
|
Link Capacity |
|
|
Uplink |
The WAN uplink capacity in Mbps. Default: 1000. Range: 1 to 1000 This is a mandatory parameter. |
|
Downlink |
The WAN downlink capacity in Mbps. Default: 1000. Range: 1 to 1000 This is a mandatory parameter. |
|
Traffic Shaping Note: Traffic Shaping supports up to 16 rules per WAN. To add a new traffic shaping rule, click Add New, the Add New Traffic Shaping Rule window appears, as shown in Figure 25. |
|
|
Enable Traffic Shaping |
Indicates whether traffic shaping is enabled or disabled. By default, this parameter is disabled. |
|
Precedence |
The precedence value for the traffic shaping rule. The precedence value can be between 1 and 150. This is a mandatory parameter. |
| Description | Displays a user-configured description for the traffic shaping rule. |
|
Uplink Bandwidth |
Indicates the uplink bandwidth in Mbps. Range: 1 to 1000 This is a mandatory parameter. |
|
Downlink Bandwidth |
Indicates the downlink bandwidth in Mbps Range: 1 to 1000 This is a mandatory parameter. |
|
DSCP |
Differentiated Services Code Point (DSCP) can range from 0 to 63, with 0 being the lowest priority and 63 being the highest priority. |
|
Type |
Indicates the type of filter rule. The following options are supported:
|
|
Deep Packet Inspection (DPI) Type |
This parameter is applicable only when Type parameter is Application Based. The following options are supported:
This is a mandatory parameter. |
|
DPI Application |
This parameter is applicable only when Deep Packet Inspection (DPI) Type parameter is set to Application. This is a mandatory parameter. |
|
DPI Category |
This parameter is applicable only when Deep Packet Inspection (DPI) Type parameter is set to Category. This is a mandatory parameter. |
|
Protocol |
This parameter is applicable only when Type parameter is IP Based. The following options are supported:
|
|
Source IP Address |
The source IPv4 address for the shaping rule. This is a mandatory parameter. |
|
Mask |
The subnet mask for the shaping rule. This is a mandatory parameter. |
|
Port |
Displays the source port from which IPv4 address messaging is sent. This is a mandatory parameter. |
|
Destination IP Address |
The destination IPv4 address for the shaping rule. This is a mandatory parameter. |
|
Mask |
The subnet mask for the shaping rule. This is a mandatory parameter. |
|
Port |
Displays the destination port to which IPv4 address messaging is sent. This is a mandatory parameter. |
|
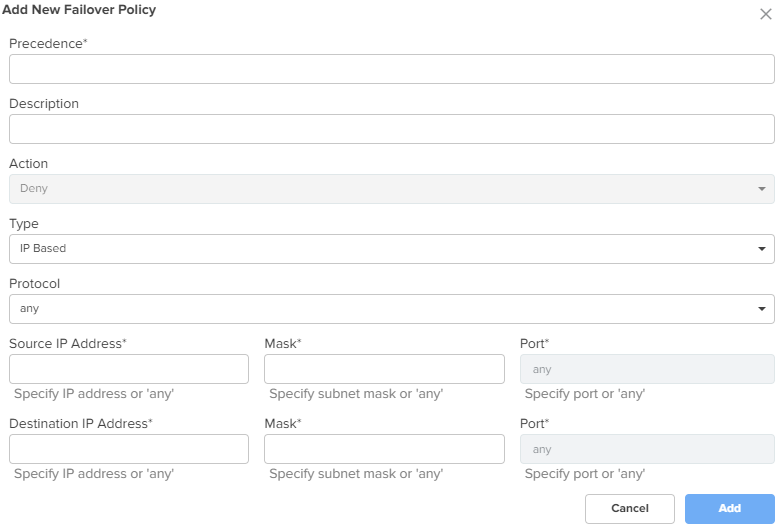
Failover Policy Note: Failover Policy supports up to 32 rules per WAN. To add a new failover policy, click Add New. The Add New Failover Policy window appears, as shown in Figure 26. |
|
|
Enable Failover Policy |
Indicates whether failover policy is enabled or disabled. By default, this parameter is disabled. |
|
Precedence |
The precedence value for the failover policy. The precedence value can be between 1 and 150. This is a mandatory parameter. |
| Description | A description for the policy. |
| Action | By default, this parameter is disabled. |
|
Type |
The type of failover rule. The following options are supported:
|
|
Protocol |
This parameter is applicable only when Type parameter is IP Based. The following options are supported:
|
|
Source IP Address |
The source IPv4 address for the failover rule. This is a mandatory parameter. |
|
Mask |
The subnet mask for the failover rule. This is a mandatory parameter. |
|
Port |
The source port for the failover rule. This is a mandatory parameter. |
|
Destination IP Address |
The destination IPv4 address for the failover rule. This is a mandatory parameter. |
|
Mask |
The subnet mask for the failover rule. This is a mandatory parameter. |
|
Port |
Displays the destination port for the failover rule. This is a mandatory parameter. |
|
Deep Packet Inspection (DPI) Type |
This parameter is applicable only when Type parameter is Application Based. The following options are supported:
This is a mandatory parameter. |
|
Apply to |
This parameter is applicable only when Type parameter is Application Based. The following options are supported:
|
| User Group |
This parameter is applicable when User Group option is selected. This is a mandatory parameter. |
| IP Address / Source Subnet |
This parameter is applicable when IP Address / Source Subnet option is selected. This is a mandatory parameter. |
|
WAN Speed Test |
|
|
Enable WAN Speed Test |
Enable or disable the WAN speed test. By default, this parameter is disabled. |
Figure 22 The Add New Source NAT Rule window
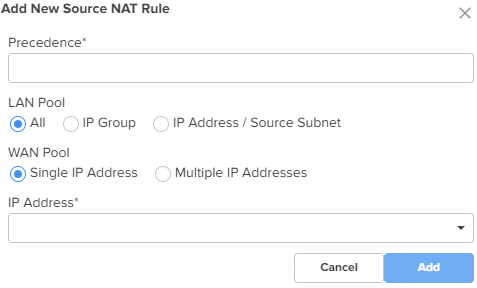
Figure 23 The Edit Monitor Host window
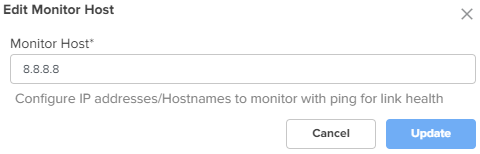
Figure 24 The Add New Monitor Host window
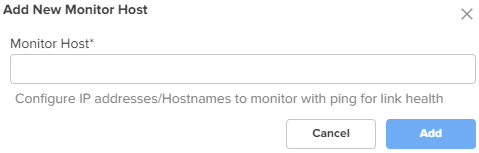
Figure 25 The Add New Traffic Shaping Rule window
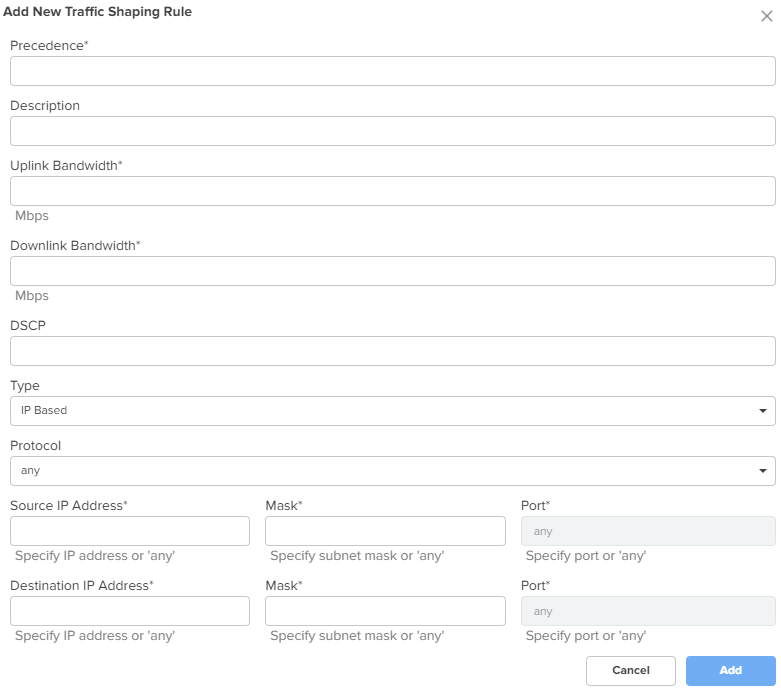
Figure 26 The Add New Failover Policy window
| 3. | Expand the Load Balancing section and configure the parameters, as described in Table 6. |
Table 6 Parameters on the Load Balancing section
|
Parameter |
Description |
|---|---|
|
Load Balancing |
|
|
WAN-1 Mode |
Determines the load balancing mode of device. By default, the WAN-1 Mode parameter is set to Shared. The following options are supported:
|
|
Traffic Share Percentage |
For the Shared mode, the traffic share percentage must be between 5 and 100. This is a mandatory parameter. |
|
WAN-2 Mode |
Determines the load balancing adjust mode of device. By default, the WAN-2 Mode parameter is set to Backup. The following options are supported:
|
|
Traffic Share Percentage |
For the Shared mode, the traffic share percentage between 5 and 100. This is a mandatory parameter. |
| 4. | Expand the Flow Preferences section and configure the parameters, as described in Table 7. |
Table 7 Parameters on the Flow Preferences section
|
Parameter |
Description |
|---|---|
|
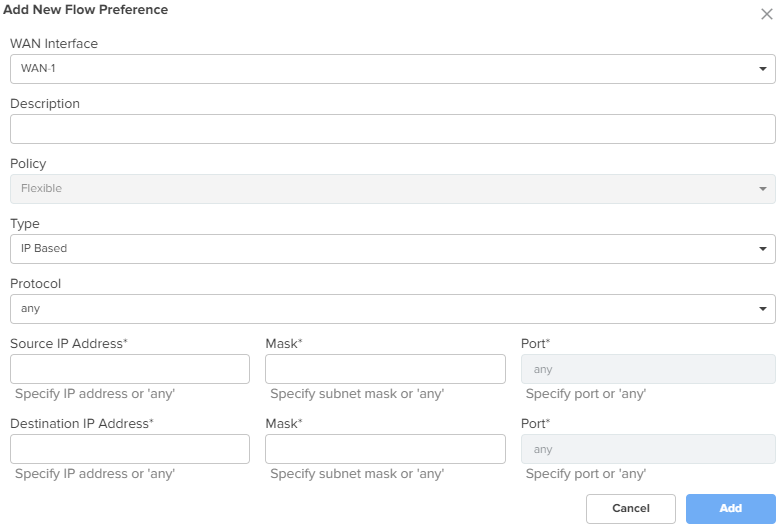
Flow Preferences Flow preferences support up to 30 rules for both WANs combined. To add a new flow preference, click Add New. The Add New Flow Preference window appears, as shown in Figure 27. |
|
|
WAN Interface |
The following options are supported:
|
| Description | Provide a description for the flow preference. |
|
Policy |
The flow preference policy. The following options are supported:
|
|
Type |
The flow preference type. The following options are supported:
|
|
Protocol |
This parameter is applicable only when Type parameter is IP Based. The following options are supported:
|
|
Source IP Address |
The source IPv4 address for the flow preference. This is a mandatory parameter. |
|
Mask |
The subnet mask for the flow preference. This is a mandatory parameter. |
|
Port |
The source port for the flow preference. This is a mandatory parameter. |
|
Destination IP Address |
The destination IPv4 address for the flow preference. This is a mandatory parameter. |
|
Mask |
The subnet mask for the flow preference. This is a mandatory parameter. |
|
Port |
The destination port for the flow preference. This is a mandatory parameter. |
|
Deep Packet Inspection (DPI) Type |
This parameter is applicable only when Type parameter is Application Based. The following options are supported:
This is a mandatory parameter. |
|
DPI Application |
This parameter is applicable only when Deep Packet Inspection (DPI) Type parameter is set to Application. This is a mandatory parameter. |
|
DPI Category |
This parameter is applicable only when Deep Packet Inspection (DPI) Type parameter is set to Category. This is a mandatory parameter. |
Figure 27 The Add New Flow Preference window
| 5. | Click Save. |
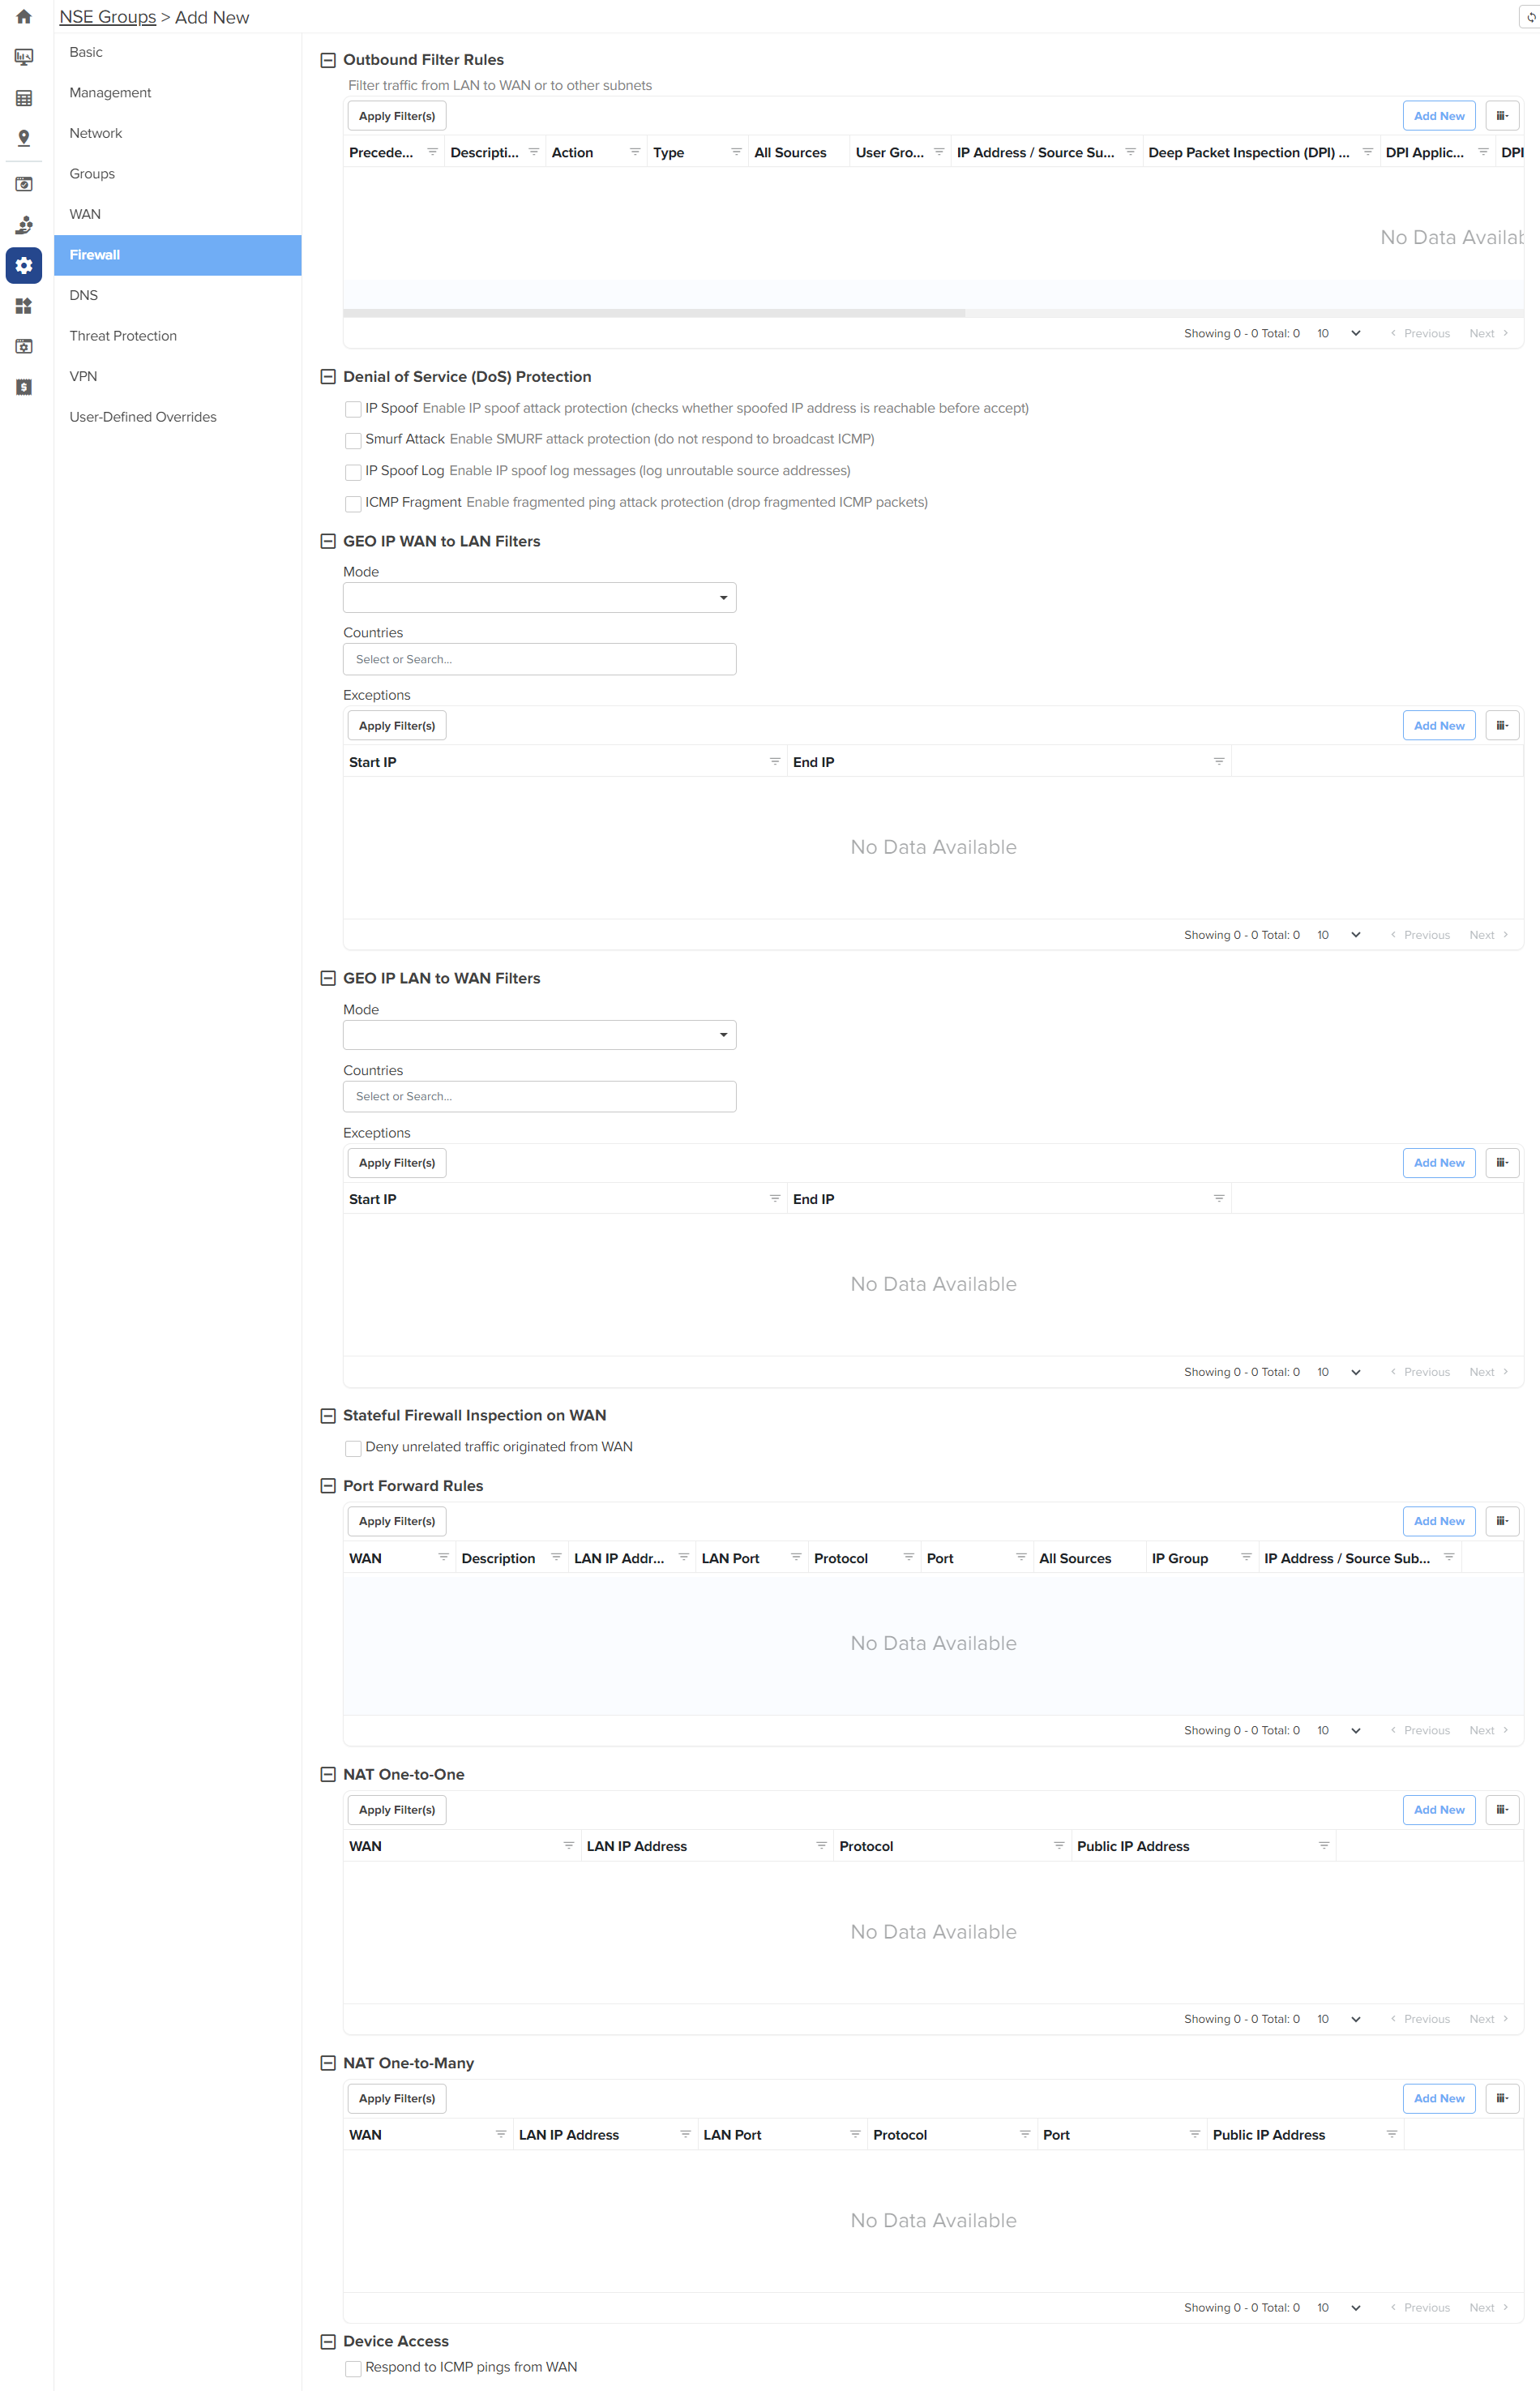
NSE 3000 firewall allows the user to configure the IP-based and application-based outbound rules, GEO IP filters, port forward rules, one-to-one NAT mappings, and one-to-many NAT mappings. All inbound connections are denied by default. You can configure port forwarding or NAT rules to allow inbound traffic. Outbound traffic is allowed by default. Using application-based outbound rules, users can create rules to block websites without specifying IP addresses or port ranges. Application-based rules allow the user to block a specific type of application within a category or all applications belonging to a category (For example, social messaging).
|
|
Up to 150 outbound firewall rules are supported for an NSE Group including combinations of IP-based and application-based rules. |
To configure parameters on the Firewall page, complete the following steps:
| 1. | On the NSE Groups > Add New page, select the Firewall tab. |
The Firewall page appears, as shown in Figure 28.
| 2. | Configure the parameters, as described in Table 8. |
Table 8 Parameters on the Firewall page
|
Parameter |
Description |
|---|---|
|
On the Firewall page, there are Outbound Filter Rules, Denial of Service (DoS) Protection, GEO IP WAN to LAN Filters, GEO IP LAN to WAN Filters, Port Forward Rules, NAT One-to-One, NAT One-to-Many, and Device Access sections. |
|
|
Outbound Filter Rules To add a new outbound filter rule, click Add New. The Add New Filter Rule window appears, as shown in Figure 29. |
|
|
Precedence |
The precedence value for the filter rule. The precedence value can be between 1 and 150. This is a mandatory parameter. |
|
Description |
Displays a user-configured description for the filter rule. |
|
Action |
Determines the action of filter. The following options are supported:
|
|
Type |
The type of filter rule. The following options are supported:
|
|
Protocol |
This parameter is applicable only when Type parameter is IP Based. The following options are supported:
|
|
Source IP Address |
The source IPv4 address for the filter rule. This is a mandatory parameter. |
|
Mask |
The source subnet mask for the filter rule. This is a mandatory parameter. |
|
Port |
This parameter is applicable only when Protocol parameter is TCP or UDP. Supported values: 1 to 65535 or any This is a mandatory parameter. |
|
Destination IP Address |
The destination IPv4 address for the filter rule. This is a mandatory parameter. |
|
Mask |
The destination subnet mask for the filter rule. This is a mandatory parameter. |
|
Port |
This parameter is applicable only when Protocol parameter is TCP or UDP. Supported values: 1 to 65535 or any This is a mandatory parameter. |
|
Deep Packet Inspection (DPI) Type |
This parameter is applicable only when Type parameter is Application Based. The following options are supported:
This is a mandatory parameter. |
|
DPI Application |
This parameter is applicable only when DPI Type parameter is set to Application. This is a mandatory parameter. |
|
DPI Category |
This parameter is applicable only when DPI Type parameter is set to Category. This is a mandatory parameter. |
|
Apply to |
This parameter is applicable only when Type parameter is Application Based. The following options are supported:
|
|
User Group |
This parameter is applicable when User Group option is selected. This is a mandatory parameter. |
|
IP Address / Source Subnet |
This parameter is applicable when IP Address / Source Subnet option is selected. This is a mandatory parameter. |
|
Denial of Service (DoS) Protection |
|
|
IP Spoof |
Enable or disable the IP spoof attack protection. By default, this parameter is disabled. |
|
Smurf Attack |
Enable or disable the smurf attack protection. By default, this parameter is disabled. |
|
IP Spoof Log |
Enable or disable IP spoof log messages. By default, this parameter is disabled. |
|
ICMP Fragment |
Enable or disable the fragmented ping attack. By default, this parameter is disabled. |
|
GEO IP WAN to LAN Filters GEO IP WAN to LAN filters allows users to configure rules to permit/deny traffic based on the source country of inbound traffic. |
|
|
Mode |
Specifies the mode for GEO IP WAN to LAN filters. The following options are supported:
|
|
Countries |
The source countries from which the traffic originates. |
|
Exceptions Exceptions allow users to configure source IP address ranges that are allowed in the inbound traffic. To add a new exception, click Add New. The Add New Exception window appears, as shown in Figure 30. |
|
|
Start IP |
Starting IPv4 address in the range. This is a mandatory parameter. |
|
End IP |
Ending IPv4 address in the range. This is a mandatory parameter. |
|
GEO IP LAN to WAN Filters GEO IP LAN to WAN Filters allows users to configure rules to permit/deny traffic based on the destination country of outbound traffic. |
|
|
Mode |
Specifies the mode for GEO IP LAN to WAN filters. The following options are supported:
|
|
Countries |
The destination countries to which the traffic is destined. |
|
Exceptions Exceptions allow users to configure destination IPv4 address ranges that are allowed in the outbound traffic. To add a new exception, click Add New. The Add New Exception window appears, as shown in Figure 30. |
|
|
Start IP |
Starting IPv4 address in the range. This is a mandatory parameter. |
|
End IP |
Ending IPv4 address in the range. This is a mandatory parameter. |
|
Stateful Firewall Inspection on WAN By default, NSE firewall routers are configured to function as stateful firewalls by dropping packets that are not related to an established connection. |
|
| Deny unrelated traffic originated from WAN |
An option to enable or disable the stateful firewall behavior. In special deployment cases, when NSE is positioned behind an MPLS uplink router, you can disable this behavior. To disable this behavior, select the Deny unrelated traffic originated from WAN check box. Additionally, you need to disable source NAT on the WAN UI page to allow routing of traffic originated on the WAN directed towards the LAN. By default, this parameter is disabled. |
|
Port Forward Rules Port Forward Rules allow users to forward traffic destined to the WAN Interface IP address of NSE 3000 on a specific TCP or UDP port to any of the LAN IP address. Port Forward Rules provides remote access to internal resources. To add a new port forward rule, click Add New. The Add New Port Forward Rule window appears, as shown in Figure 31. |
|
|
WAN |
The interface to forward inbound traffic to the internal host. The following options are supported:
|
|
Description |
Displays the user-configured description for the port forward rule. |
|
LAN IP Address |
The IPv4 address to which traffic will be forwarded. This is a mandatory parameter. |
|
LAN Port |
The LAN port to which the traffic will be forwarded. Supported values: 1 to 65535. This is a mandatory parameter. |
|
Protocol |
The protocol of forwarded traffic. The following options are supported:
|
|
Port |
The destination port of the incoming traffic on the WAN interface. Supported values: 1 to 65535. This is a mandatory parameter. |
|
Apply To |
The following options are supported:
|
|
IP Group |
This parameter is applicable only when IP Group option is selected. |
|
IP Address / Source Subnet |
This parameter is applicable only when IP Address / Source Subnet option is selected. This is a mandatory parameter. |
|
NAT One-to-One NAT One-to-One allows users to map an IP address on the WAN side to a LAN IP address. The IP address on the WAN side should be different from any of the WAN interface (WAN-1/WAN-2) IP addresses. NAT One-to-One rules provide remote access to any of the LAN resources. To add a new NAT one-to-one, click Add New. The Add New NAT One-to-One window appears, as shown in Figure 32. |
|
|
WAN |
The following options are supported:
|
|
Public IP Address |
The public IPv4 address on the WAN side that is used to access the LAN resource. The public IPv4 address is different from the IPv4 address of the WAN (WAN-1/WAN-2) interfaces. This is a mandatory parameter. |
|
LAN IP Address |
The LAN IPv4 address of the server which is hosting the resource. This is a mandatory parameter. |
|
Protocol |
The protocol of the incoming traffic. The following options are supported:
|
|
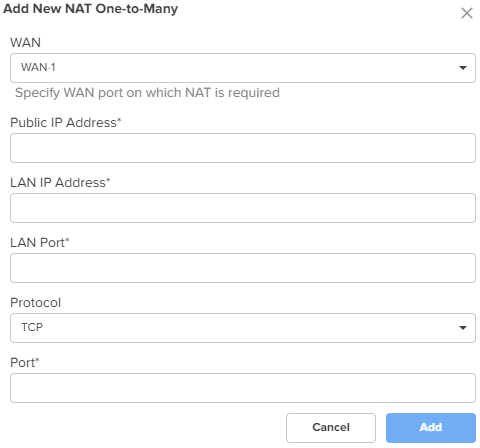
NAT One-to-Many NAT One-to-Many provides remote access to internal resources. It maps a public IP address to multiple LAN IPs and ports. To add a new NAT one-to-many, click Add New, the Add New NAT One-to-Many window appears, as shown in Figure 33. |
|
|
WAN |
The following options are supported:
|
|
Public IP Address |
The public IPv4 address on the WAN side that is used to access the LAN resource. The public IPv4 address is different from the IPv4 address of the WAN (WAN-1/WAN-2) interfaces. This is a mandatory parameter. |
|
LAN IP Address |
The LAN IPv4 address of the server which is hosting the resource. This is a mandatory parameter. |
|
LAN Port |
The LAN Port which is hosting the resource. This is a mandatory parameter. |
|
Protocol |
The protocol of the incoming traffic. The following options are supported:
|
|
Port |
The destination port of the incoming traffic on the WAN interface. This is a mandatory parameter. |
|
Device Access |
|
|
Respond to ICMP pings from WAN |
This parameter is disabled by default. When enabled, this service is enabled for all the sources, unless specific IP addresses or IP groups are configured in the IP Group and IP Address / Source Subnet parameters. |
|
IP Group |
Specifies the IP group for this service. |
|
IP Address / Source Subnet |
Specifies the IPv4 address or source subnet for this service. |
Figure 29 The Add New Filter Rule window
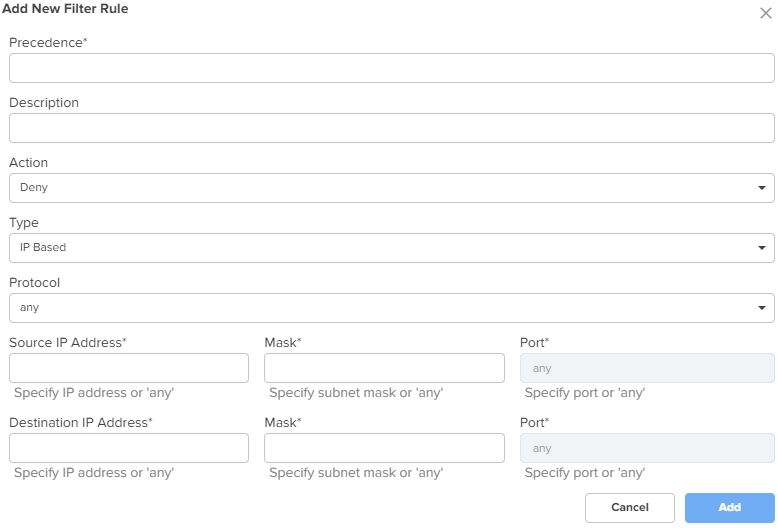
Figure 30 The Add New Exception window
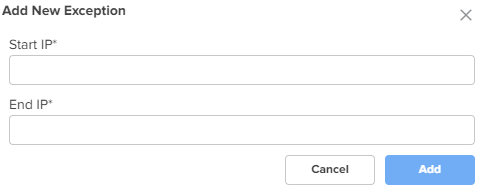
Figure 31 The Add New Port Forward Rule window
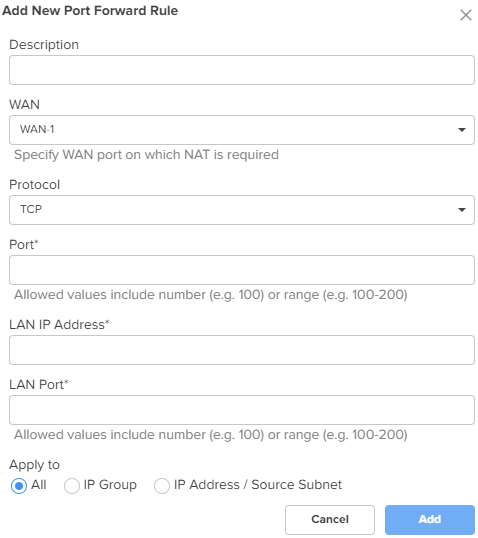
Figure 32 The Add New NAT One-to-One window
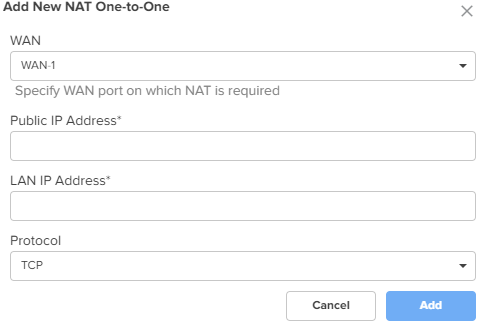
Figure 33 The Add New NAT One-to-Many window
| 3. | Click Save. |
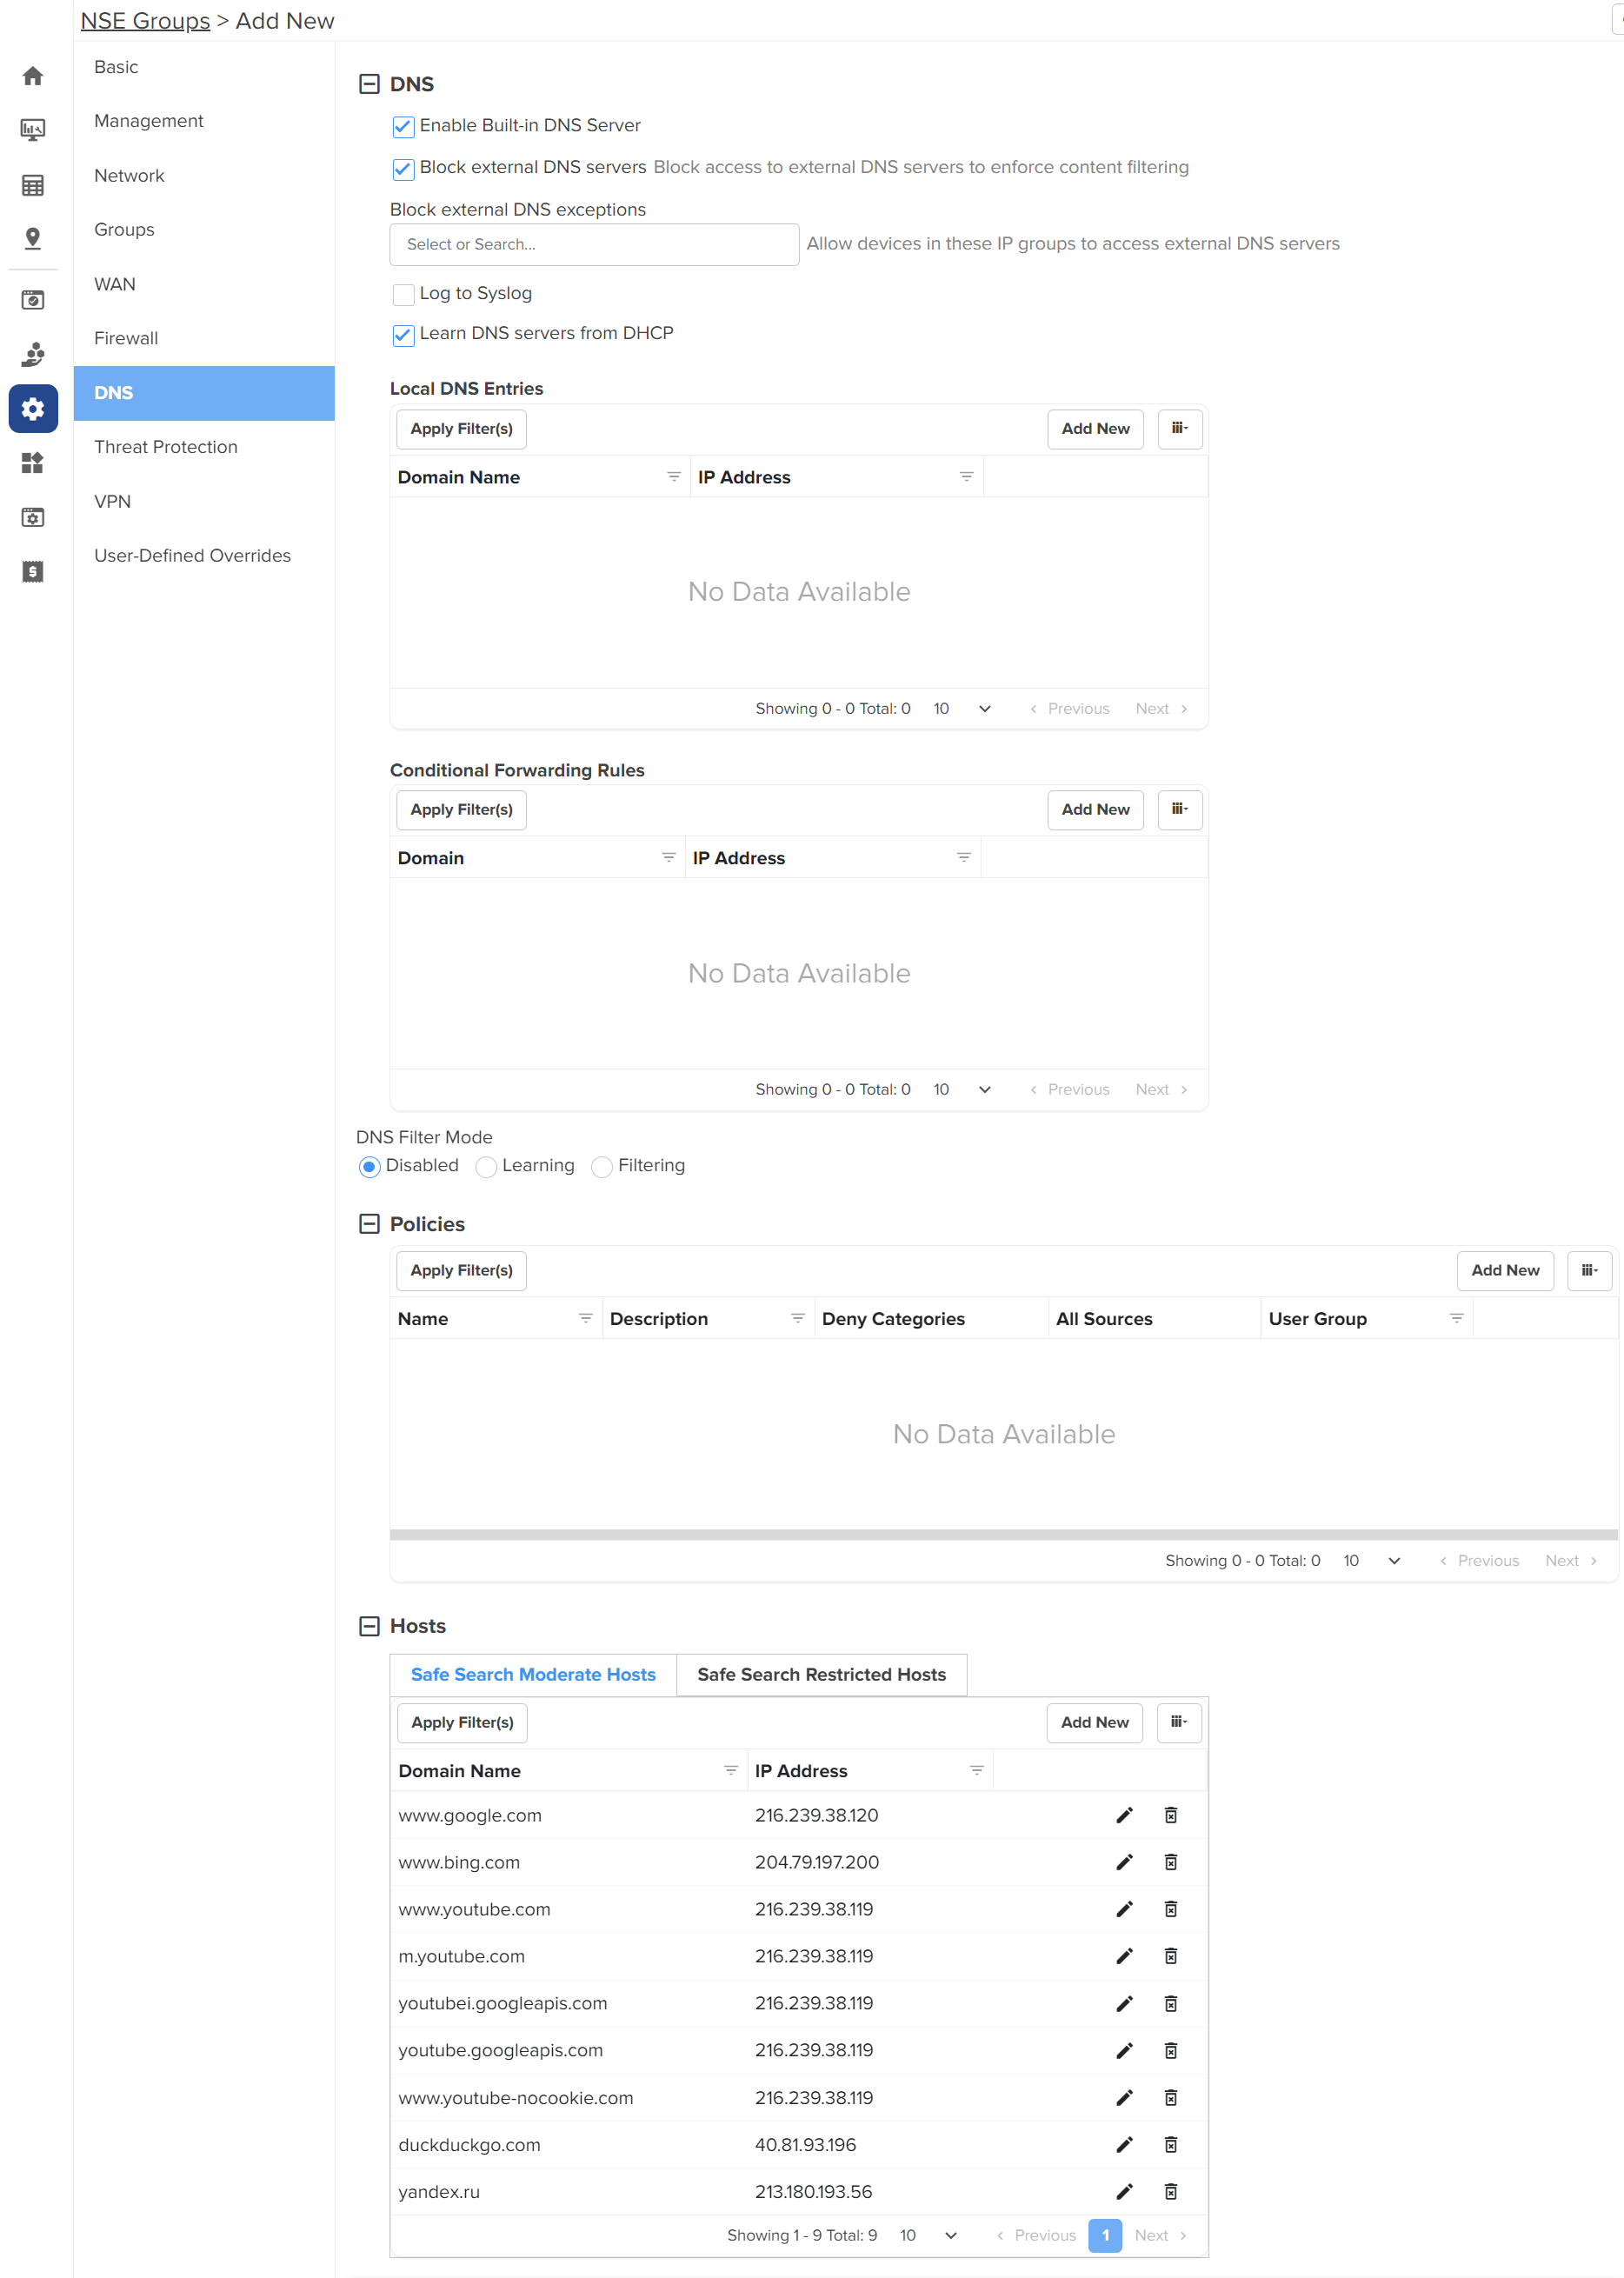
NSE 3000 supports DNS-based filters. DNS-based filters allow users to block certain category of websites. From the blocked list, users can still allow certain websites by adding them to the exception list. For example, if user blocks social-media category then all the social websites will be blocked including linkedin.com since linkedin.com belongs to social-media category. Adding linkedin.com to the Exception to filters list will allow access to linkedin.com while blocking other social-media websites.
To configure parameters on the DNS page, complete the following steps:
| 1. | On the NSE Groups > Add New page, select the DNS tab. |
The DNS page appears, as shown in Figure 34.
| 2. | Configure the parameters, as described in Table 9. |
Table 9 Parameters on the DNS page
|
Parameter |
Description |
|---|---|
|
On the DNS page, there are DNS, Policies, and Hosts sections. |
|
|
DNS |
|
|
Enable Built-in DNS Server |
Indicates whether the on-board DNS server is enabled or disabled. By default, this parameter is enabled. |
| Block external DNS servers |
Blocks the client to reach to any external DNS servers. By default, this parameter is enabled. |
| Block external DNS exceptions | Allows the clients added in the exceptions list to reach to any external DNS servers. |
|
Log to Syslog |
Specifies whether the DNS queries received from the client is logged to an external syslog server. |
|
Learn DNS servers from DHCP |
Dynamically learns the DNS server IP on WAN. By default, this parameter is enabled. When you disable this parameter, the Primary DNS and Secondary DNS parameters are displayed. |
|
Primary DNS |
The IPv4 address of the primary upstream DNS server. |
|
Secondary DNS |
The IPv4 address of the secondary upstream DNS server. |
|
Local DNS Entries To add a new local host, click Add New. The Add New Local Host window appears, as shown in Figure 35. |
|
|
Domain |
A domain name for the local host. This is a mandatory parameter. |
|
IP address |
The IPv4 address of the local host. This is a mandatory parameter. |
|
Conditional Forwarding Rules To add a new forwarding rule, click Add New. The Add New Forwarding Rule window appears, as shown in Figure 36. |
|
|
Domain |
A domain name for the forwarding rule. This is a mandatory parameter. |
|
IP address |
The IPv4 address of the server to which the DNS query is forwarded. |
|
DNS Filter Mode |
Specifies the mode for DNS filtering. The following options are supported:
|
|
Policies To add a new policy, click Add New. The Add New Policy window appears, as shown in Figure 37. |
|
|
Name |
Name for the policy. This is a mandatory parameter. |
|
Description |
Description about the policy. |
|
Deny categories |
Categories to deny in the following sections:
Expand the sections and select individual categories. To select all categories in a section, select the check box provided for the section. |
|
Safe Search Mode |
The following options are supported:
|
|
Allow Exceptions (List of Domain Names) |
Enter the exempted domain names separated by a comma (,). |
|
Apply to |
The following options are supported:
|
|
User Group |
This parameter is applicable only when User Group option is selected for Apply to parameter. This is a mandatory parameter. |
|
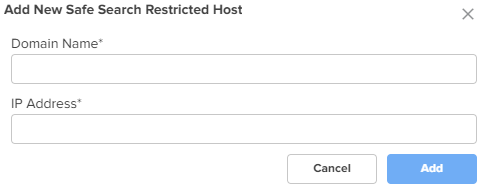
Hosts Hosts section contains two tabs - Safe Search Moderate Hosts and Safe Search Restricted Hosts The following parameters appear in both the tabs and can be configured as required. A list of hosts are already added by default. You can modify these hosts by clicking the edit |
|
|
Domain Name |
The domain name for the safe search host This is a mandatory parameter. |
|
IP address |
The IPv4 address of the safe search host. This is a mandatory parameter. |
Figure 35 The Add New Local Host window
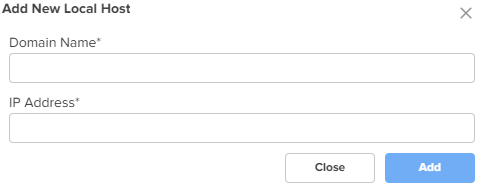
Figure 36 The Add New Forwarding Rule window
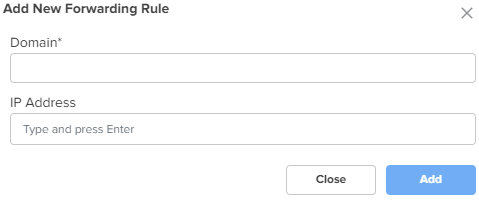
Figure 37 The Add New Policy window
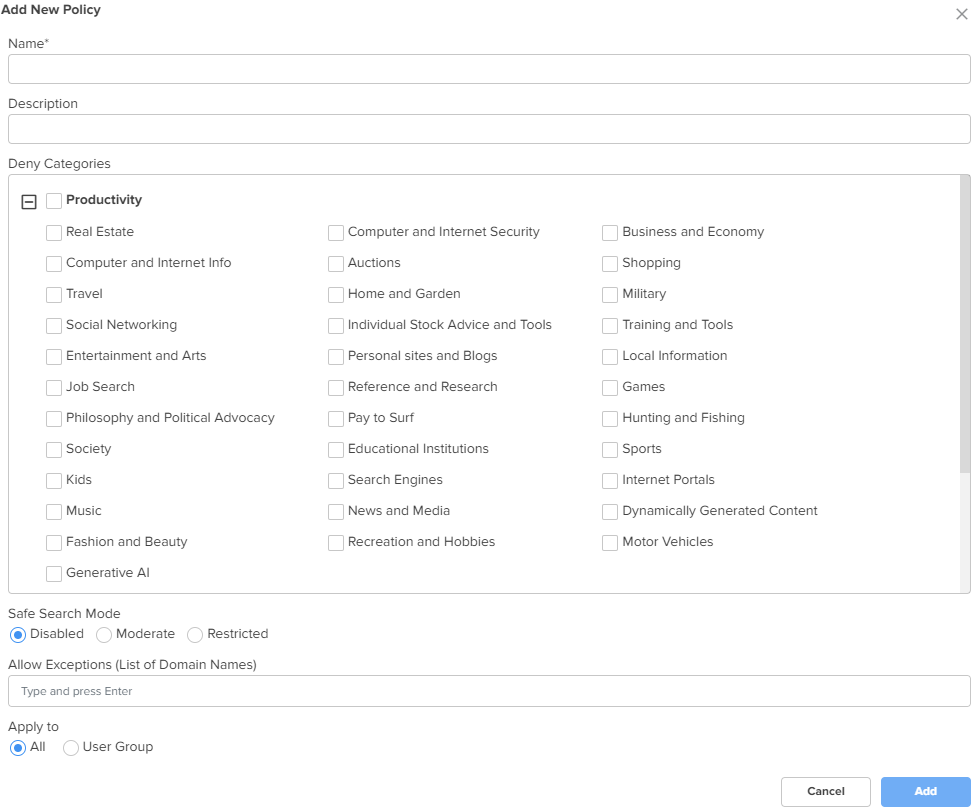
Figure 38 The Add New Safe Search Moderate Host

Figure 39 The Add New Safe Search Restricted Host
| 3. | Click Save. |
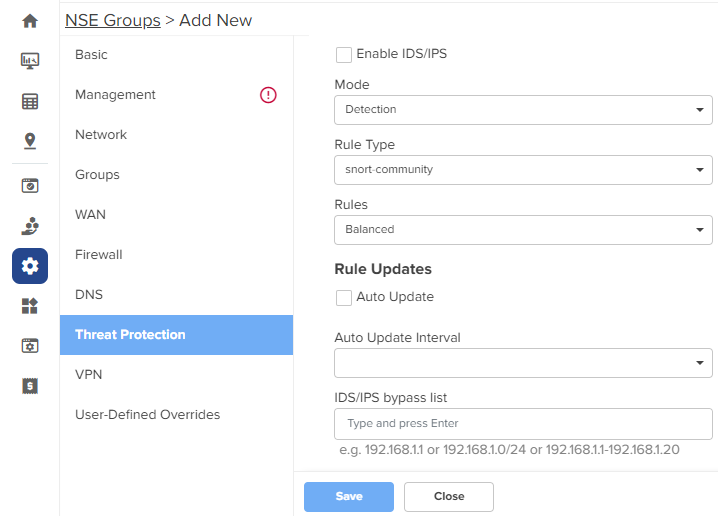
Using the Threat Protection tab, you can configure the Intrusion Detection and Prevention system (IDS/IPS) parameters.
NSE 3000 supports IDS/IPS engine. IPS engine uses a series of rules that help define a malicious network activity. IPS engine supports rules from snort and emerging threats. The solution supports both community and licensed rules. The IPS engine uses these rules to find packets that match against them and generates alerts for users.
To configure parameters on the Threat Protection page, complete the following steps:
| 1. | On the NSE Groups > Add New page, select the Threat Protection tab. |
The Threat Protection page appears, as shown in Figure 40.
Figure 40 The Threat Protection page
| 2. | Configure the parameters, as described in Table 10. |
Table 10 Parameters on the Threat Protection page
|
Parameter |
Description |
|---|---|
| IDS/IPS | |
|
Enable IDS/IPS |
Indicates whether IDS/IPS is enabled or disabled. By default, this parameter is disabled. |
|
Mode |
Specifies the IDS/IPS mode. The following options are supported:
|
|
Rule Type |
Specifies the IDS/IPS rule type. The following options are supported:
|
|
Rules |
Specifies the IDS/IPS rule policy. This parameter is applicable when Rule Type is snort-vrt or snort-community. The following options are supported:
|
|
Oink Code |
This parameter is applicable when Rule Type is snort-vrt or emergency- threats pro. |
|
Category |
Categories to select from the Category section. This parameter is applicable when Rule Type is snort-vrt or emergency- threats pro. |
|
Rule Updates |
|
|
Auto Update |
Indicates whether the IDS/IPS rules must be automatically updated or not. By default, this parameter is disabled. When Auto Update is enabled, NSE 3000 will periodically download and activate the IDS/IPS rules. |
|
Auto Update Interval |
Time interval for the periodic updates of IDS/IPS rules. The following options are supported:
|
|
IDS/IPS bypass list |
List of allowed IPv4 addresses or range of allowed IPv4 addresses. IDS/IPS operating in prevention mode blocks traffic from a host on detecting malicious traffic from the host. When an IPv4 address is part of allowed IP addresses, IDS/IPS will not block traffic from the host even when malicious traffic is detected. |
| 3. | Click Save. |
NSE 3000 provides an on-board VPN server that allows remote users to establish a connection using the native VPN client supported in most of the operating systems. The VPN server uses the L2TP/IPsec protocol with the IPsec encryption and hashing algorithms. The VPN server maintains a pool of IP addresses and leases the IP addresses from this pool for remote users.
NSE 3000 also provides an on-board RADIUS server that allows authentication and accounting of enterprise and remote users. The RADIUS server maintains user profiles in a central database.
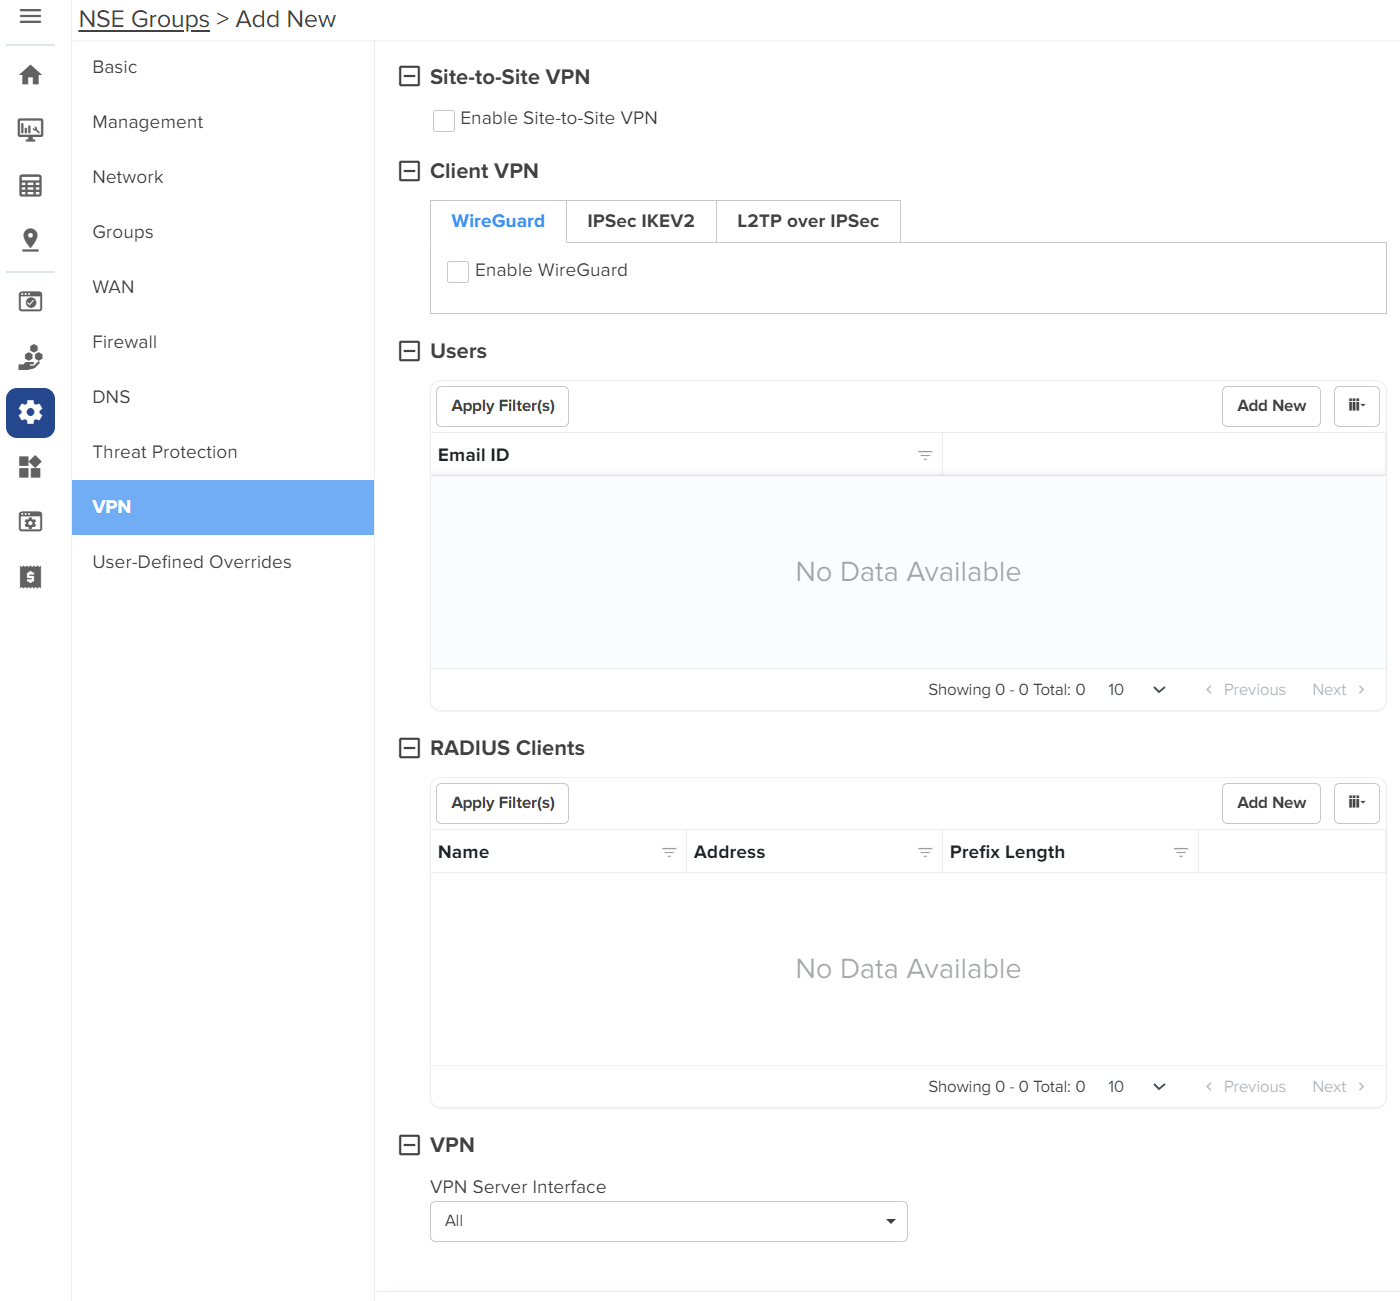
Using the VPN tab, you can configure DNS server, VPN server, and RADIUS server parameters.
To configure parameters on the VPN page, complete the following steps:
| 1. | On the NSE Groups > Add New page, select the VPN tab. |
The VPN page appears, as shown in Figure 41.
| 2. | Configure the parameters, as described in Table 11. |
Table 11 Parameters on the VPN page
|
Parameter |
Description |
|---|---|
|
On the VPN page, there are Site-to-Site VPN, Client VPN, Users, RADIUS Clients, and VPN sections. |
|
|
Site-to-Site VPN IPsec tunnel is a VPN technology that provides a secure, encrypted connection between two devices or networks over the internet or another public network. It uses IPsec protocols to encrypt the traffic between two endpoints, making it difficult for anyone to intercept the communication. IPsec site-to-site tunnel is used to connect two remote sites for secure communications. NSE allows setting up tunnels both in responder mode and initiator mode. Both, IKEv1 and IKEv2 are supported in the configuration. The default version is IKEv2. Note: You can configure up to 100 IPsec tunnels. Pre-shared key is the authentication method supported by the device. Each site can have its own pre-shared key. The site is identified by an identifier (string or the IP address of the site). Each site has to be configured with a local and remote site for the tunnel to establish. To view the IPsec tunnel stats, navigate to the NSE Group > Network > VPN Sites tab, as shown in Figure 43. To add a new site-to-site VPN, click Add New. The Add New Site-to-Site VPN window appears, as shown in Figure 42. |
|
| Enable Site-to-Site VPN |
Indicates whether site-to-site VPN is enabled or disabled. By default, this parameter is disabled. |
| Following parameters appear when you select Enable Site-to-Site VPN check box. | |
| Name |
A name for the new site-to-site VPN. This is a mandatory parameter. |
| IKE version |
The Internet Key Exchange (IKE) version for the site-to-site VPN. The following options are supported:
|
| Role |
Specifies the role for the tunnels. The following options are supported:
Default role: Responder |
| Dead peer detection interval |
The interval (in seconds) for detecting dead peers. Range: 30 - 600 seconds. Default: 120 seconds This is a mandatory parameter. |
| Remote ID |
The remote ID. The value of 192.168.50.10 is pre-configured and is not modifiable. This is a mandatory parameter. |
| Local ID |
The local ID. This is a mandatory parameter. |
| Local Subnets |
The comma-separated list of local subnets. This is a mandatory parameter. |
| Remote Subnets |
The comma-separated list of remote subnets. This is a mandatory parameter. |
| Remote PSK |
The remote PSK. This is a mandatory parameter. |
| Local PSK |
The local PSK. This is a mandatory parameter. |
| The following parameters are common for both IKE Phase 1 and IKE Phase 2. | |
| Encryption |
The following options are supported:
|
| Integrity |
The following options are supported:
|
| DH Group |
The following options are supported:
|
| Key Lifetime |
The duration (in hours) for the pre-shared key. Range: 1 to 24 |
|
Client VPN: This section contains the following tabs: |
|
|
WireGuard: A VPN protocol that is highly secure. It is simpler and more efficient than traditional IPSec. |
|
| Enable WireGuard |
Indicates whether WireGuard is enabled or disabled. By default, this parameter is disabled. |
| Following parameters appear when you select Enable WireGuard check box. | |
| Port |
Indicates the WireGuard listen port number. Default: 51820 This is a mandatory parameter. |
| Client Pool |
Indicates the WireGuard interface IP for the device and the client IPs to be assigned for the WireGuard clients. This is a mandatory parameter. |
| Keep Alive |
Periodic keep alive packets sent for the configured duration. Default: 5 seconds This is a mandatory parameter. |
| Enable Split Tunnel |
Indicates whether the split tunnel is enabled or disabled. By default, this parameter is disabled. Note: When you enable split tunnel, only the traffic destined to tunnelled subnets is allowed. You can override the Enable Split Tunnel parameter at the user level. |
| Tunnelled Subnets |
Specifies the list of local subnets in NSE that should be allowed access from the WireGuard clients. Note: The same Tunnelled Subnets field is auto-populated in the Add New User window. You can edit this field at the user level. |
| Enable IPSec IKEV2 |
Indicates whether IPSec IKEV2 is enabled or disabled. By default, this parameter is disabled. |
| Following parameters appear when you select Enable IPSec IKEV2 check box. | |
|
Client IP Pool Range Start |
Starting IPv4 address in the range. This is a mandatory parameter. |
|
Client IP Pool Range End |
Ending IPv4 address in the range. This is a mandatory parameter. |
| Enable L2TP over IPSec |
Indicates whether L2TP over IPSec is enabled or disabled. By default, this parameter is disabled. |
| Following parameters appear when you select Enable L2TP over IPSec check box. | |
|
Client IP Pool Range Start |
Starting IPv4 address in the range. This is a mandatory parameter. |
|
Client IP Pool Range End |
Ending IPv4 address in the range. This is a mandatory parameter. |
|
IPsec Shared Secret |
Enter a pre-shared key string for the IPsec protocol. The shared secret is used between the VPN Client and Server for device authentication. This is a mandatory parameter. |
| Enable 2FA |
Indicates whether two-factor authentication (2FA) is enabled or disabled. By default, this parameter is disabled. |
|
VPN Two-Factor Authentication
|
|
|
Users: This section is common for all the three protocols - WireGuard, IPSec IKEV2, and L2TP over IPSec. To add a new user, click Add New. The Add New User window appears, as shown in Figure 44. |
|
| Email ID |
Email ID of the user. This is a mandatory parameter. |
| Password |
Password for the user. This is a mandatory parameter. |
| Enable WireGuard |
Indicates whether WireGuard is enabled or disabled. By default, this parameter is disabled. |
| Following parameters appear when Enable WireGuard check box is selected in the Add New User window. | |
| Enable Split Tunnel |
Indicates whether split tunnel is enabled or disabled. By default, this parameter is enabled. |
| Tunnelled Subnets |
Specifies the list of local subnets in NSE that should be allowed access from the WireGuard clients. |
| Device |
Indicates the NSE device. When you select an NSE device, the device's public key is populated in the [Peer] section of the WireGuard client configuration file. This is a mandatory parameter. |
| WAN Interface |
WAN Interface of the NSE device. When you select a WAN interface, the NSE's WAN IP is populated as the endpoint IP in the [Peer] section of the WireGuard client configuration file. The following WAN Interface options are supported:
|
|
Clients: In this section, you have an option to add a new WireGuard client. To add a new WireGuard client, click Add New. The Add New WireGuard Client window appears, as shown in Figure 45. |
|
| Name |
Name for the new WireGuard client. This is a mandatory parameter. |
| Auto generate key pair |
Generates a public and private key pair for the client. By default, this parameter is enabled. When this option is enabled, the Client Public Key field is auto-populated with the public key generated for that client. When this option is disabled, you need to provide the WireGuard client public key generated on the WireGuard client device. |
| Client Public Key |
Public key of the client. This is a mandatory parameter. |
| IP Address | Auto-generated IP address of the WireGuard client. |
|
Note: You have options to download QR code and configuration file in the Add New WireGuard Client window, as shown in Figure 45. |
|
|
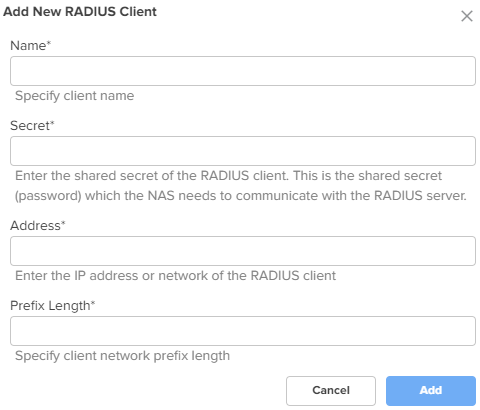
RADIUS Clients To add a new RADIUS client, click Add New. The Add New RADIUS Client window appears, as shown in Figure 46. |
|
|
Name |
Name of the RADIUS client. This is a mandatory parameter. |
|
Secret |
The shared secret of the RADIUS client. This is the shared secret (password) that the NAS needs to communicate with the RADIUS server. This is a mandatory parameter. |
|
Address |
The IPv4 address or network address of the RADIUS client. This is a mandatory parameter. |
|
Prefix Length |
The client network prefix length. This is a mandatory parameter. |
|
VPN |
|
| VPN Server Interface |
The following options are supported:
|
Figure 42 The Add New Site-to-Site VPN window
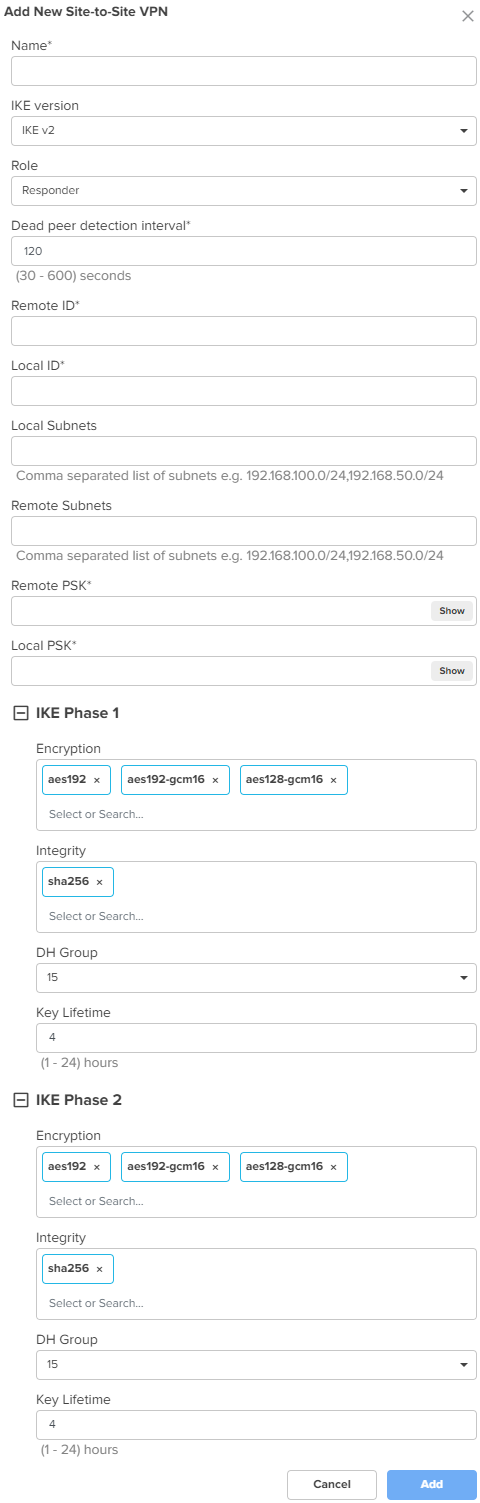

Figure 44 The Add New User window
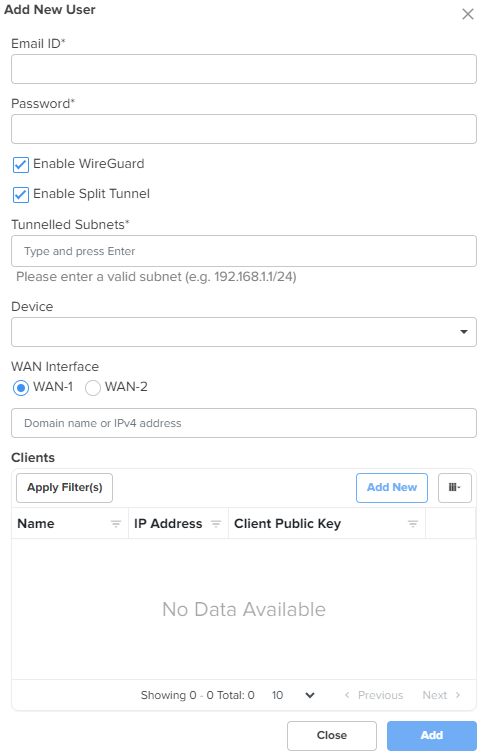
Figure 45 The Add New WireGuard client window
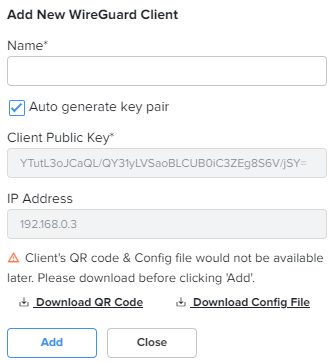
Figure 46 The Add New RADIUS Client window
| 3. | Click Save. |
Using the User-Defined Overrides tab, you can configure the user-defined overrides.
To configure parameters on the User-Defined Overrides page, complete the following steps:
| 1. | On the NSE Groups > Add New page, select the User-Defined Overrides tab. |
The User-Defined Overrides page appears, as shown in Figure 47.
Figure 47 The User-Defined Overrides page
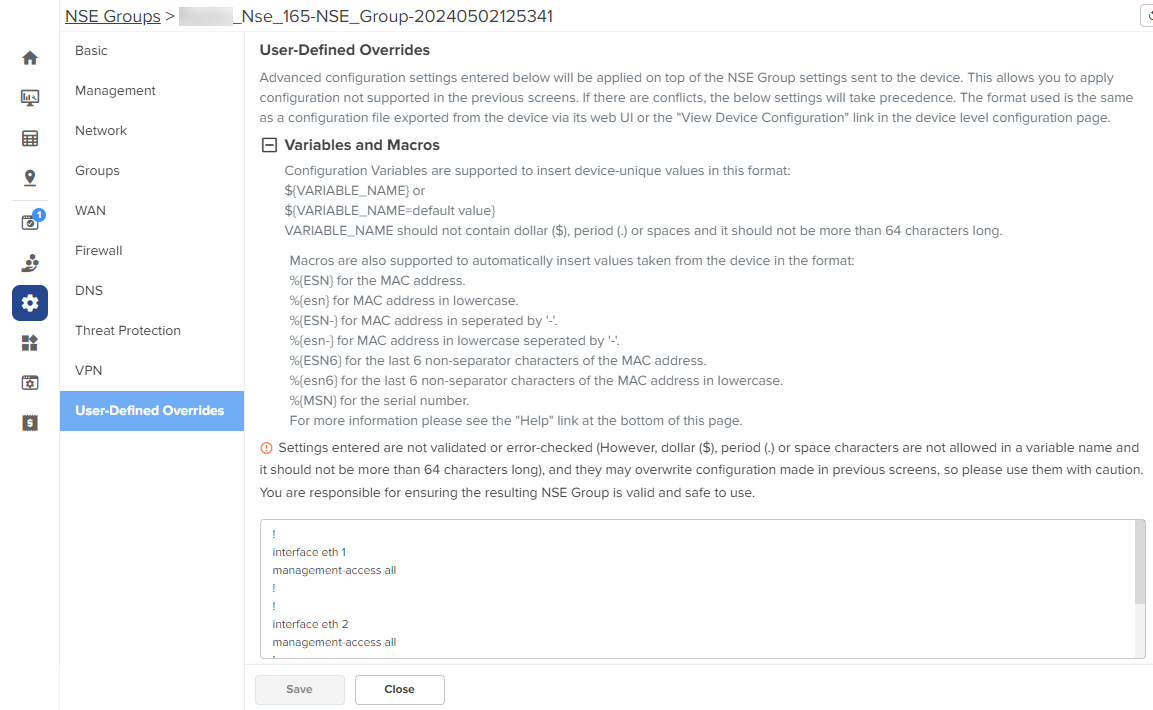
| 2. | In the text box, enter the configuration that you want to apply to the device. |
| 3. | Click Save. |
In the WAN page, you can configure the device’s IPv4 address based on the IP mode.
|
|
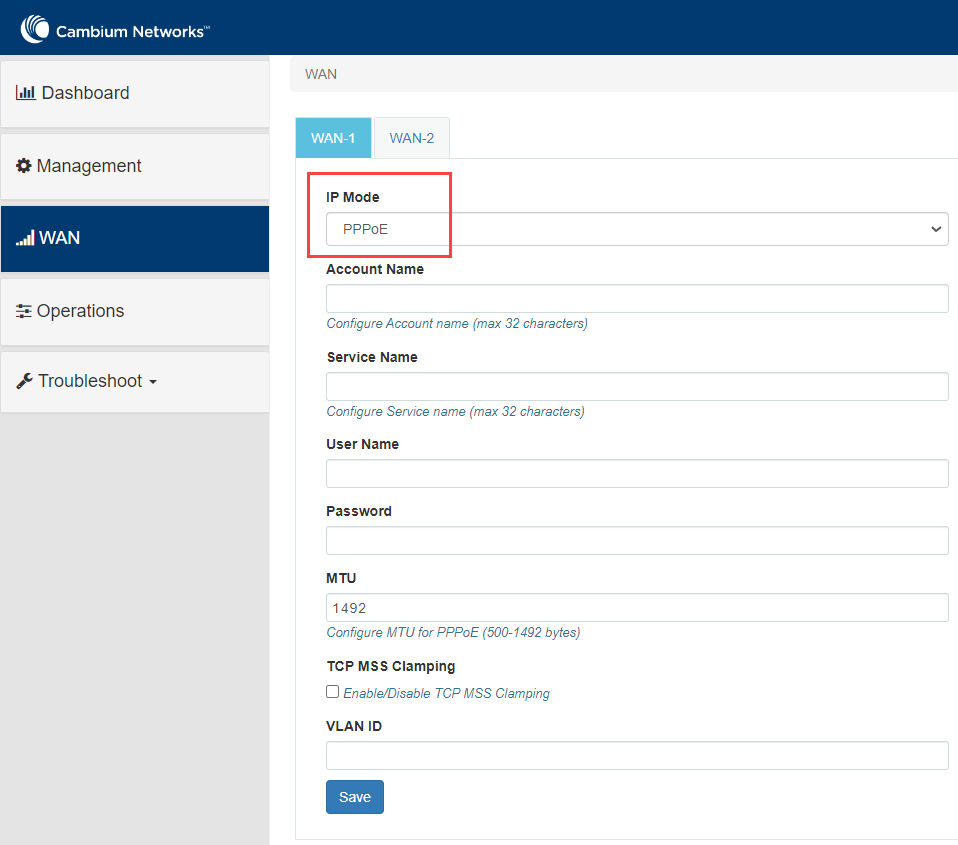
If PPPoE is used as the WAN connection mode as shown in Figure 48, make sure to configure the PPPoE username and password. Once you have configured the PPPoE user name and password, you can proceed to configure the NSE group by providing the same username and password and then attaching the default NSE group to the device. |
Figure 48 PPPoE as WAN connection mode
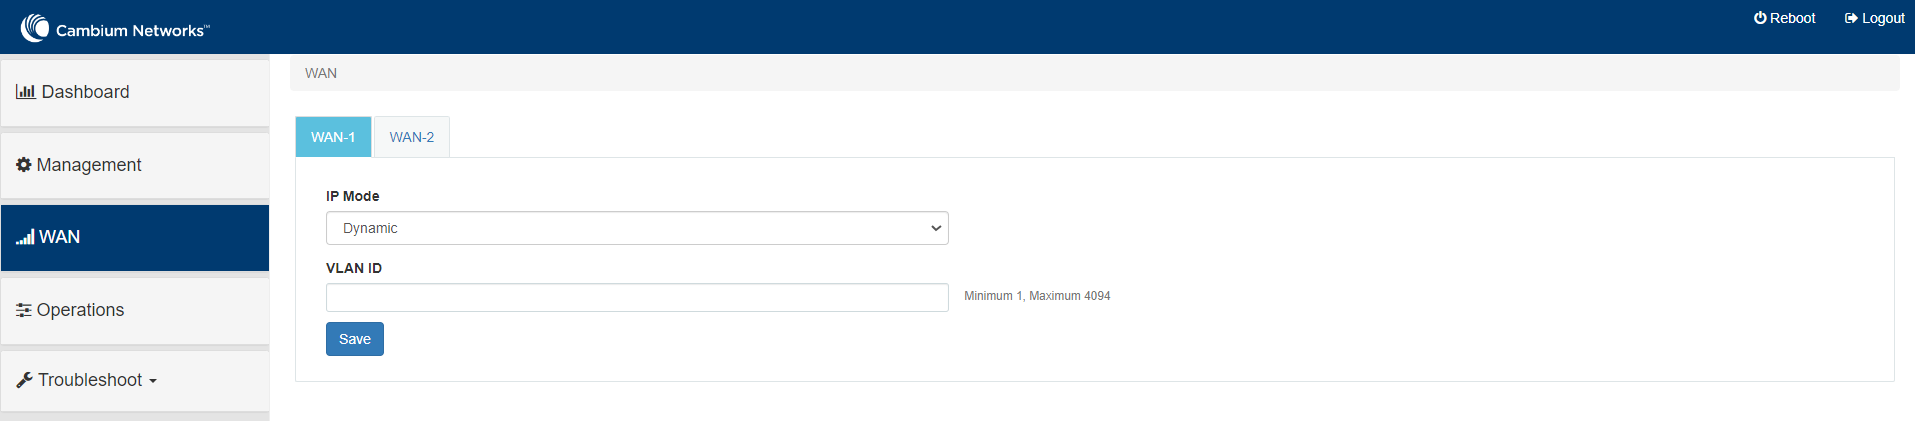
To view and configure the WAN settings, complete the following steps in the device UI:
| 1. | From the main NSE 3000 dashboard page, click WAN tab from the left panel. |
The WAN page appears, as shown in Figure 49.
|
|
By default, WAN-1 page appears. You can configure WAN on WAN-1 or WAN-2. |
| 2. | Configure the parameters, as described in Table 12. |
Table 12 Parameters on the WAN page
|
Parameter |
Description |
|---|---|
|
IP Mode |
Determines the network that must be configured to use IPv4 addresses. The following options are supported:
By default, the Dynamic mode is selected. |
|
VLAN ID |
The VLAN ID can range from 1 to 4094. The VLAN configuration is optional. When the 802.1Q header is configured, all transmitted frames are expected to include the 802.1Q header with the same VLAN ID. |
|
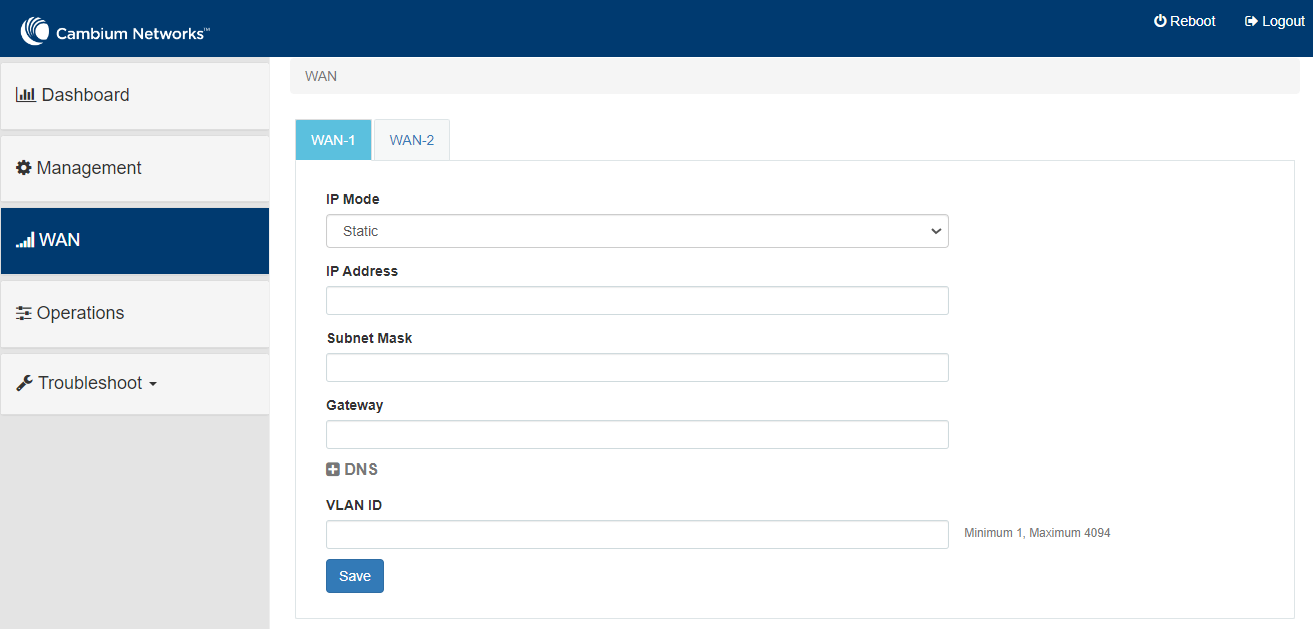
Following parameters appear only when you select the mode as Static from the IP Mode drop-down list, as shown in Figure 50. |
|
|
IP Address |
The 32-bit binary number that identifies a network element by both network and host. |
|
Subnet Mask |
The subnet mask for the destination IP/network for the route. |
|
Gateway |
The gateway for the destination IP/network for the route. |
|
DNS |
|
|
Primary DNS |
The IPv4 address of primary upstream DNS server. |
|
Secondary DNS |
The IPv4 address of secondary upstream DNS server. |
|
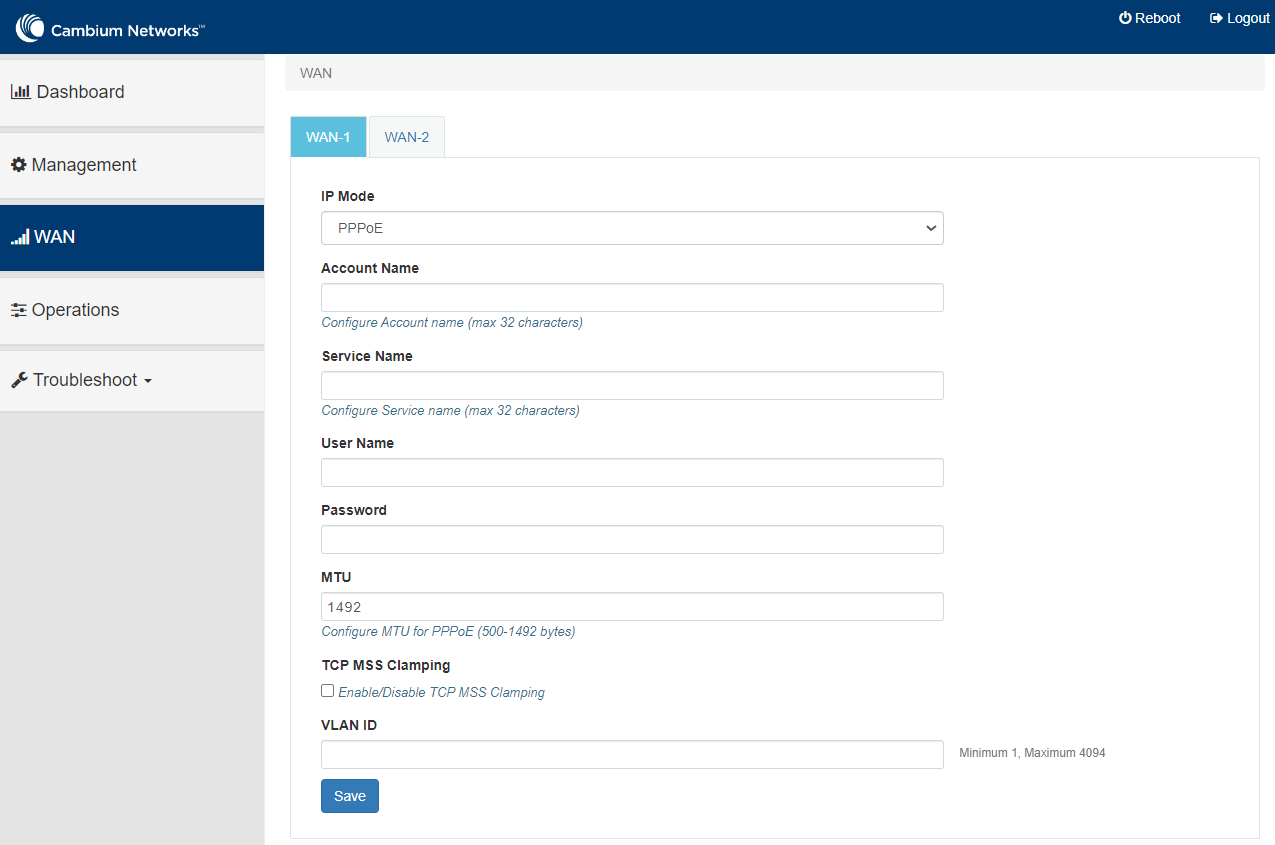
Following parameters appear only when you select the mode parameter as PPPoE from the IP Mode drop-down list, as shown in Figure 51. |
|
|
Account Name |
The name of Access Controller. This parameter allows a maximum of 32 characters. This parameter is optional. |
|
Service Name |
Service name of Access Controller. This parameter allows a maximum of 32 characters. This parameter is optional. |
|
User Name |
A user name for PPPoE authentication. This parameter is mandatory. |
|
Password |
A password for PPPoE authentication. This parameter is optional. |
|
MTU |
MTU for PPPoE interface in bytes. Default: 1492. Range: 500 to 1492 |
|
TCP MSS Clamping |
Indicates whether TCP MSS Clamping is enabled or disabled. By default, this parameter is disabled. |
| 3. | Click Save. |